According to recent statistics, the average person spends almost 7 hours a day on their screens worldwide. While you’re most likely not spending all that time browsing away on Google Chrome, there is a high probability you are among the 3.62 billion people who prefer this particular browser. So, what do you do when Chrome fails you?
Connectivity hiccups, while not prevalent, are inevitable – systems fail, networks break, and errors occur. In this article, we’ll find out how to access blocked sites in Chrome: the good, the free, and the best practices available right now to keep you connected at all times.
How to Check Blocked Websites on Chrome
Before fixing the problem, you need to understand what’s causing it. The issue might lie in the website itself, Chrome’s errors, or your network’s malfunction. Here are a couple of common reasons:
- Incorrect Chrome settings;
- Extension clash;
- Local network restrictions;
- Geo-restrictions or government blocks;
- The website’s server is down.
For a quick system check-up, I’d recommend using Iphey.com. The service runs a test of vital systems, checking your IP, network, soft- and hardware. Ultimately, it showcases whether your system and browser are working correctly and tells you if your IP is being flagged as spam and/or triggering anti-bot systems.

Most often, the problem is fixed with those easy solutions:
- Disable extensions;
- Clear cache;
- Try incognito mode;
- Try a different browser.
If all these methods fail, the problem lies deeper than just your browser.
Free Ways to Open Blocked Sites in Chrome
Before resorting to “heavy-duty” solutions, you can try these easy and fast methods, which will suffice for bypassing simple ISP restrictions or network malfunctions.
The System’s Restricted Sites List
If the device you’re operating is provided by your school or place of work, that unreachable destination site might be restricted by the system itself.
To see if your device bans access to any websites, follow these simple steps.
For Windows:
Step 1: Type Internet options into your Windows PC search or Settings search bar and click on the related icon.
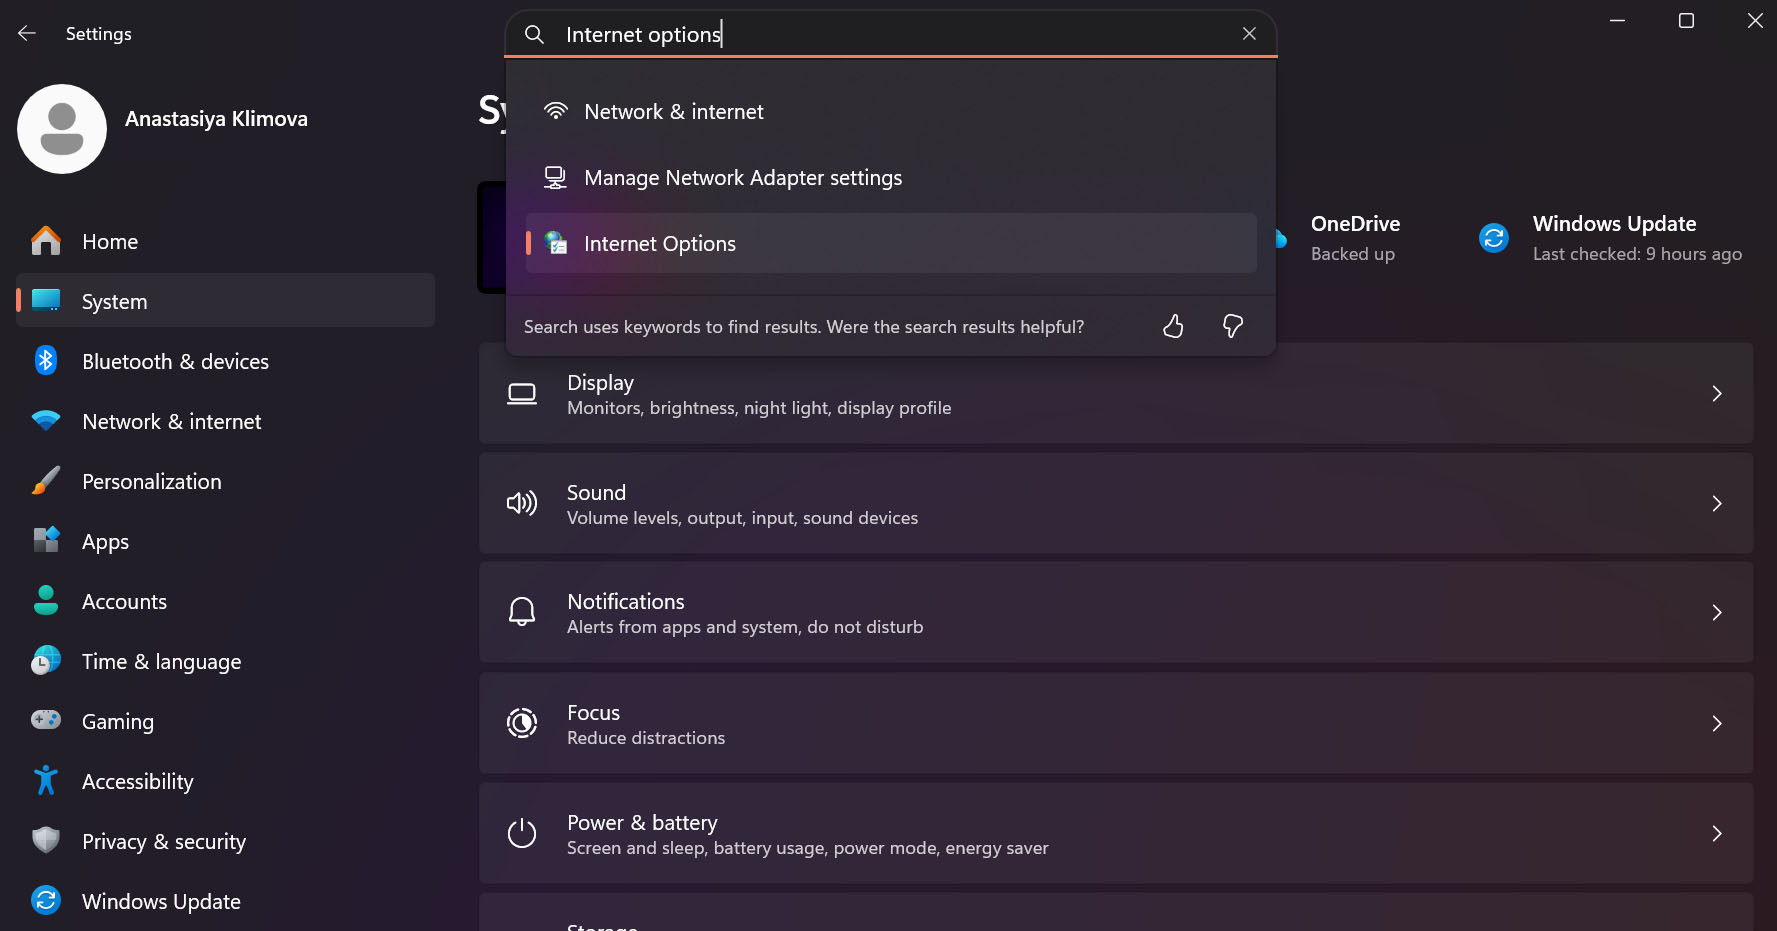
Step 2: In the pop-up window navigate to the Security tab, then Restricted Sites, and click the Sites button under the icon. If your destination website made its way on that list, simply select the site and click Remove.
For MacOS:
MacOS doesn’t have a direct equivalent for this method; however, you can check the Screen Time restrictions.
Step 1: Open System Settings and navigate to Screen Time in the left sidebar.
Step 2: If it is turned on, click on Content Restrictions and look at the Web Content section – make sure it is not set to restrict websites, and check that your domain name is not on the Restricted list.
Archived Version
If accessing the most current version of the website doesn’t matter to you, try the Internet Archive’s Wayback Machine. The service is basically a digital library that keeps snapshots of billions of websites over time. Wayback Machine might suffice for accessing text data, such as banned news sites or forums; however, you won’t be able to log into your account, as the service only saves public pages.
This method, like the service itself, is pretty straightforward. Upon accessing the Wayback Machine, you will find a simple search bar – input the URL of your destination website there, hit enter, then select any of the available dates on the calendar and times when the snapshot was taken.
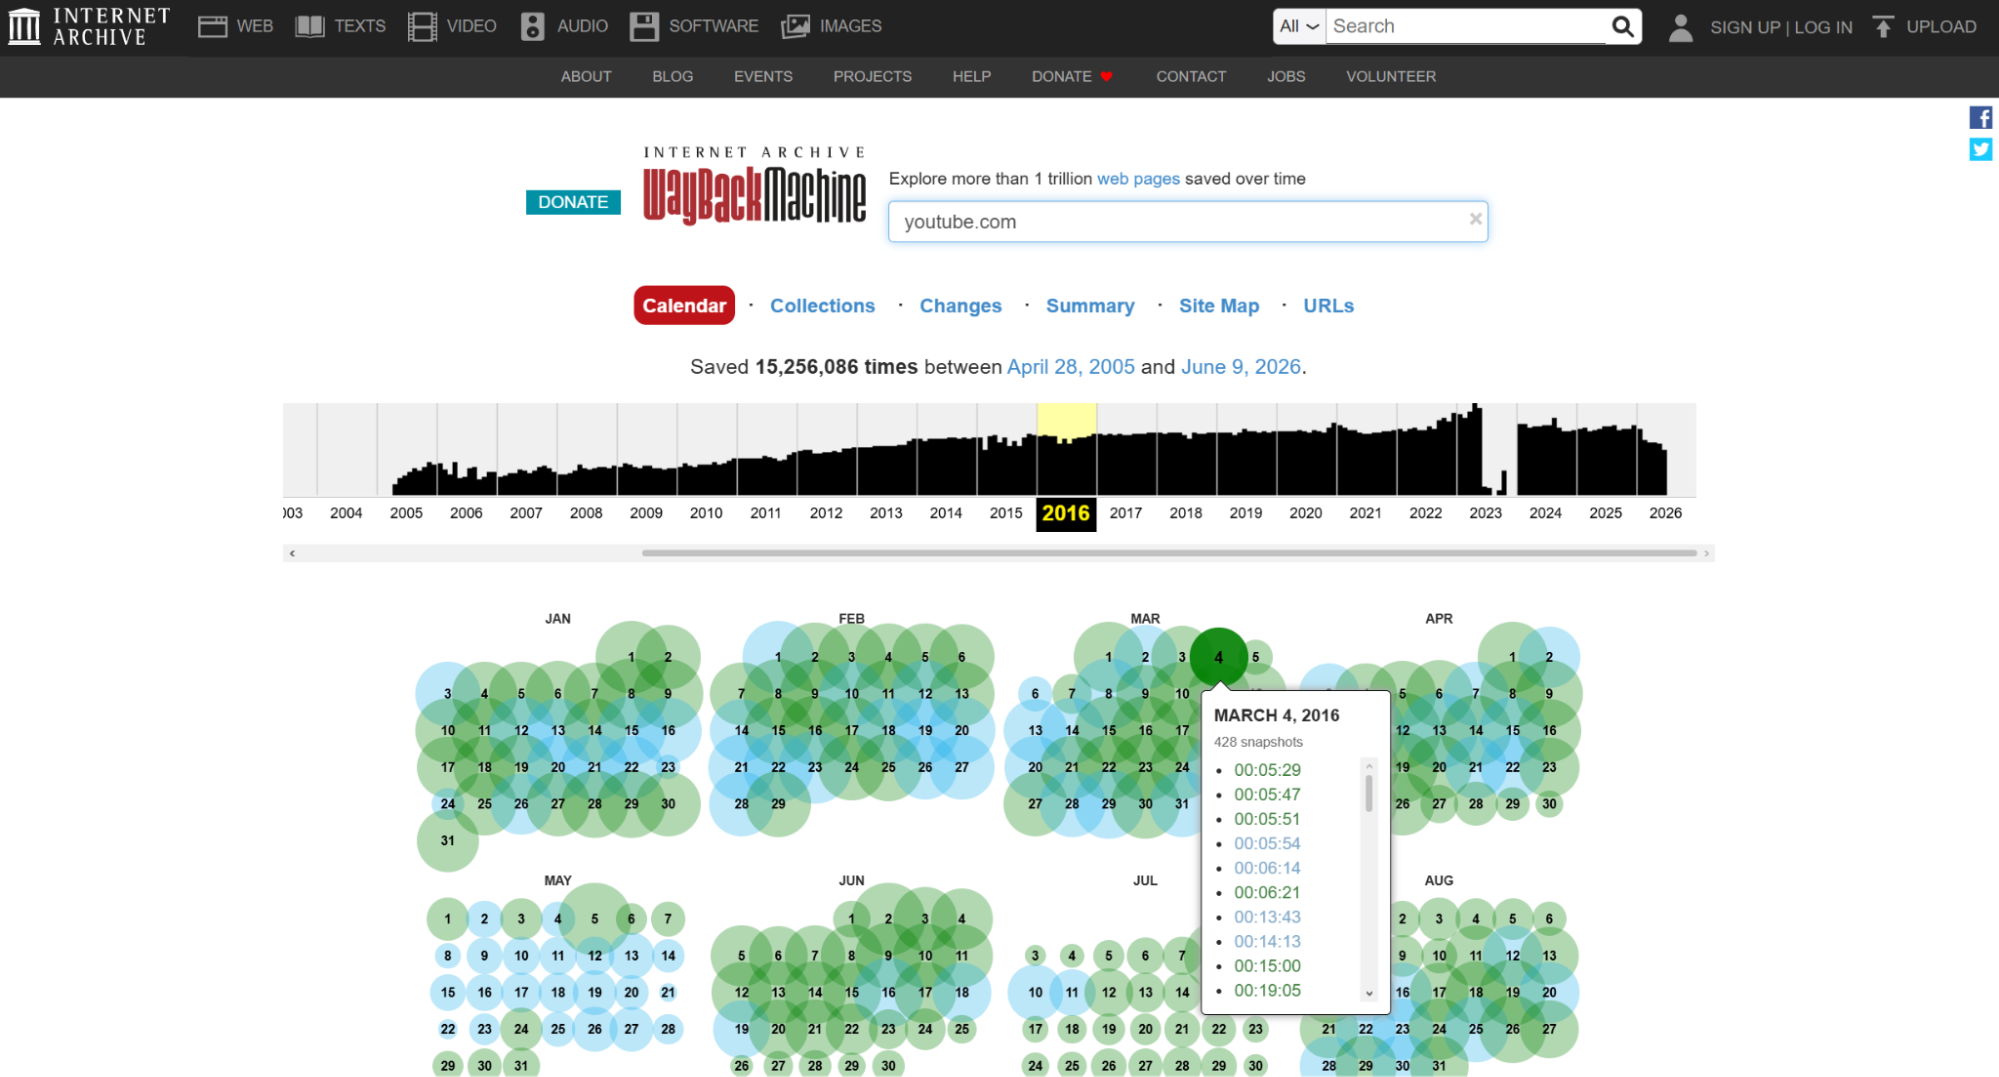
Obviously, this method won’t fit every use case. Because Wayback Machine offers only a copy of an archived website, most of its interactive features, such as search bars, forms, or even buttons, won’t be available. Additionally, the service often fails to load media materials on archived pages, and if your destination site is too small or niche, Wayback Machine might not have a copy of it.
DNS Settings
In addition to hostnames and URLs we use to access the websites, each domain on the internet has a dedicated numerical address. DNS, or Domain Name System, is a server set between you and the computing device needed to translate your word searches into their IP address equivalents.
By default, the DNS server is provided to your device by your internet service provider, so if your internet company decides to block a certain website, the DNS won’t be able to find the necessary numerical address and connect you to it. In this case, it might be worth a try to switch to Cloudflare’s or Google’s own DNS servers. Luckily, you can do so through Google Chrome browser.
Step 1: Click on three vertical dots in the right top corner of the browser and navigate to Settings.
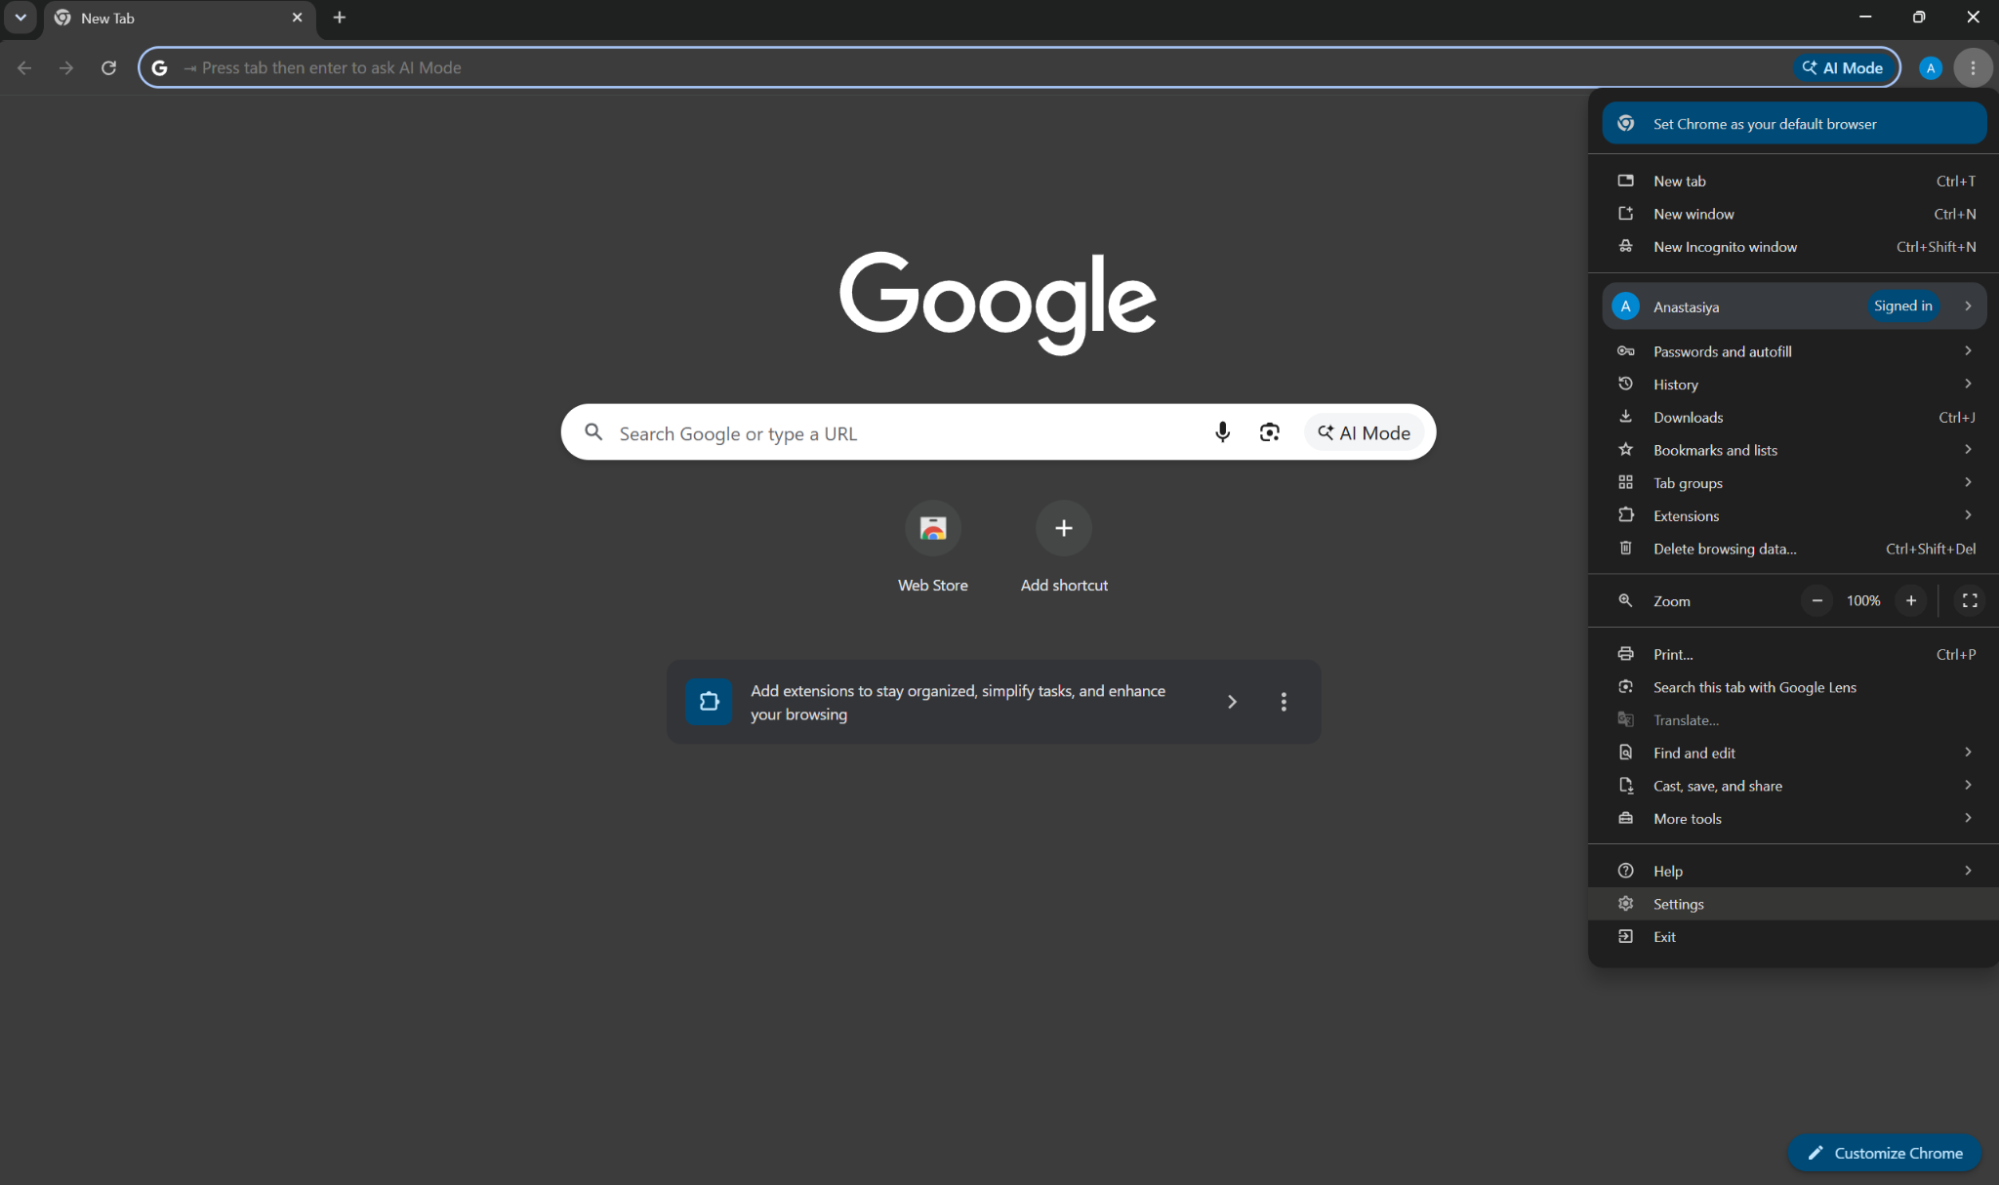
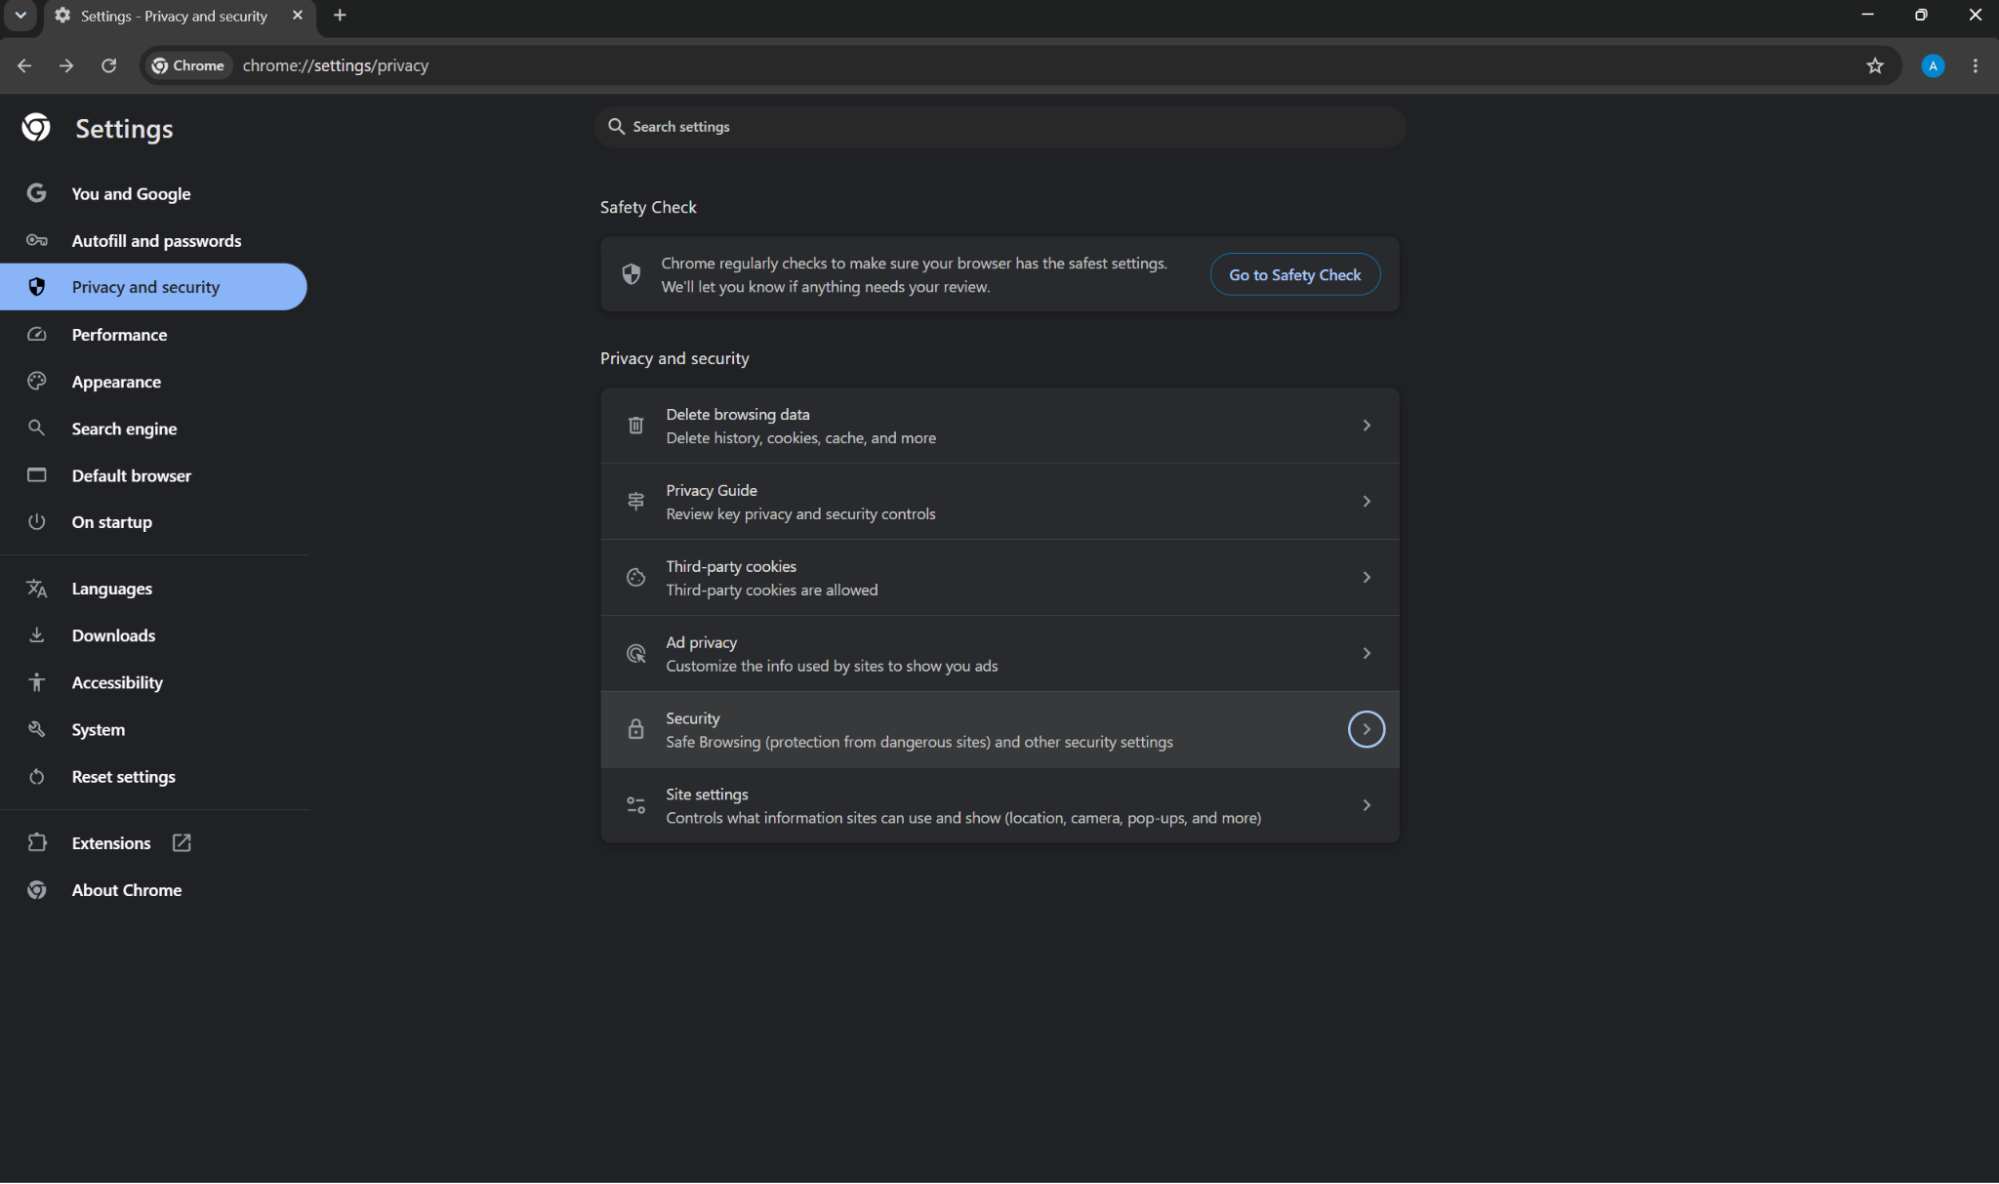
Step 2: Choose the Privacy and Security tab from the options on the left, then click on Security.
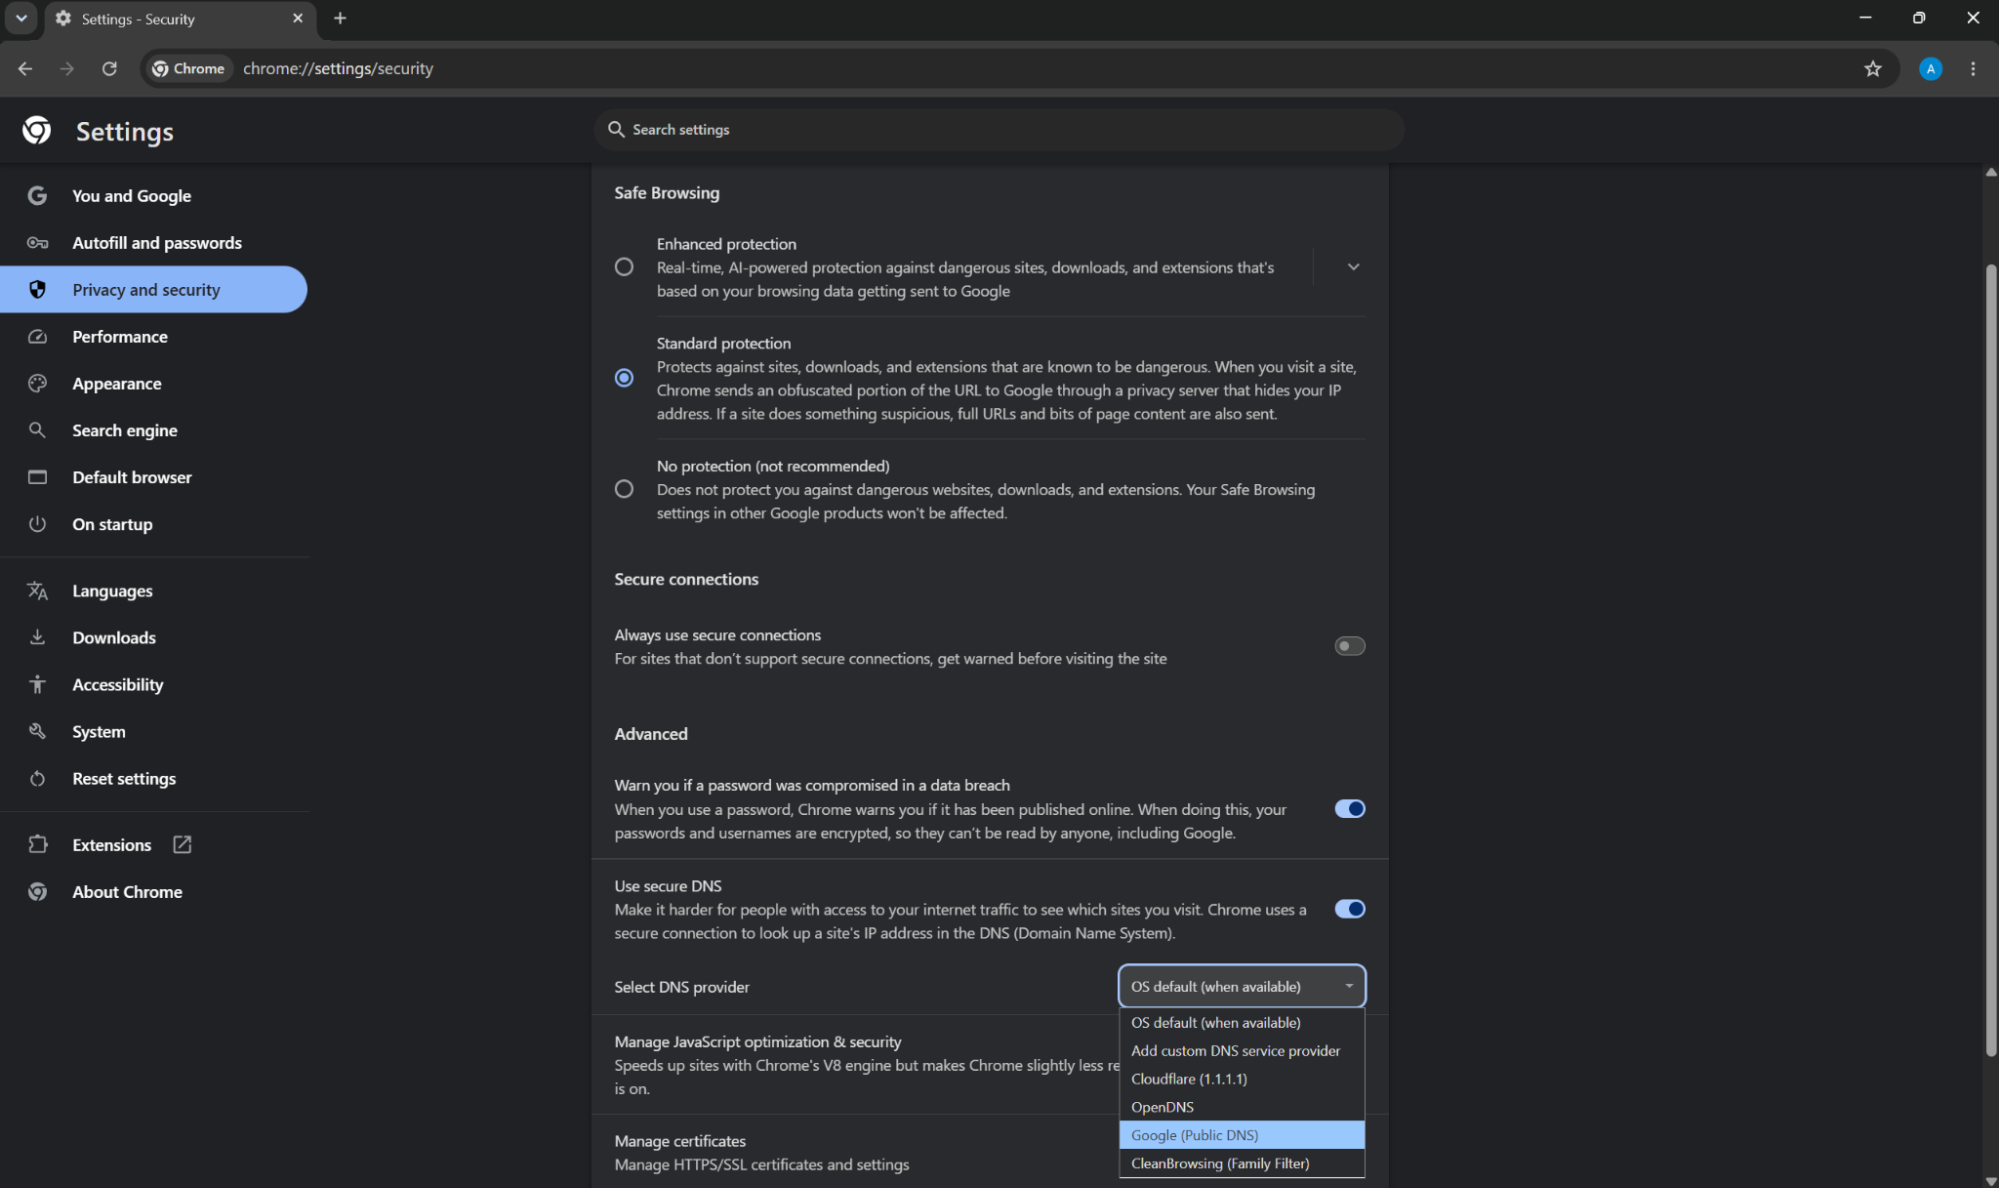
Step 3: There, navigate to Advanced settings, click on the dropdown list next to Select DNS Provider, and choose any available option.
If none of the aforementioned methods proved successful, the block is most likely happening at a deeper network level rather than a simple browser restriction – either the network block is highly secure, or the website itself is actively rejecting your connection. In both of these cases, I’d highly recommend trying proxies.
How to Unblock Sites on Chrome Using Proxies
Proxy routes your traffic through the provider’s dedicated server, ultimately hiding your IP by providing a different one of your choosing. Additionally, proxies provide utmost performance speed and are able to handle massive amounts of data with ease due to a simplified encryption method that lacks the heavy processing employed by VPNs or the Tor network.
Proxies also stand as one of the best solutions if you’re dealing with strict government restrictions. Censorship models look for distinct signatures of VPN protocols specifically, so a premium proxy server is invisible to firewalls because it looks identical to regular browsing. That is also why even the strictest of governments are usually more legally lenient towards proxy services.
For a while, my go-to proxy provider has been Floppydata. The service not only offers a great selection of proxy locations, plenty to bypass every possible geo-restriction, but also provides a user-friendly dashboard, which helps you configure all-encompassing proxy strings in seconds and manage your traffic with ease.
Proxy Configuration and Set Up with Floppydata
Step 1: Sign up to Floppydata and purchase a suitable plan.
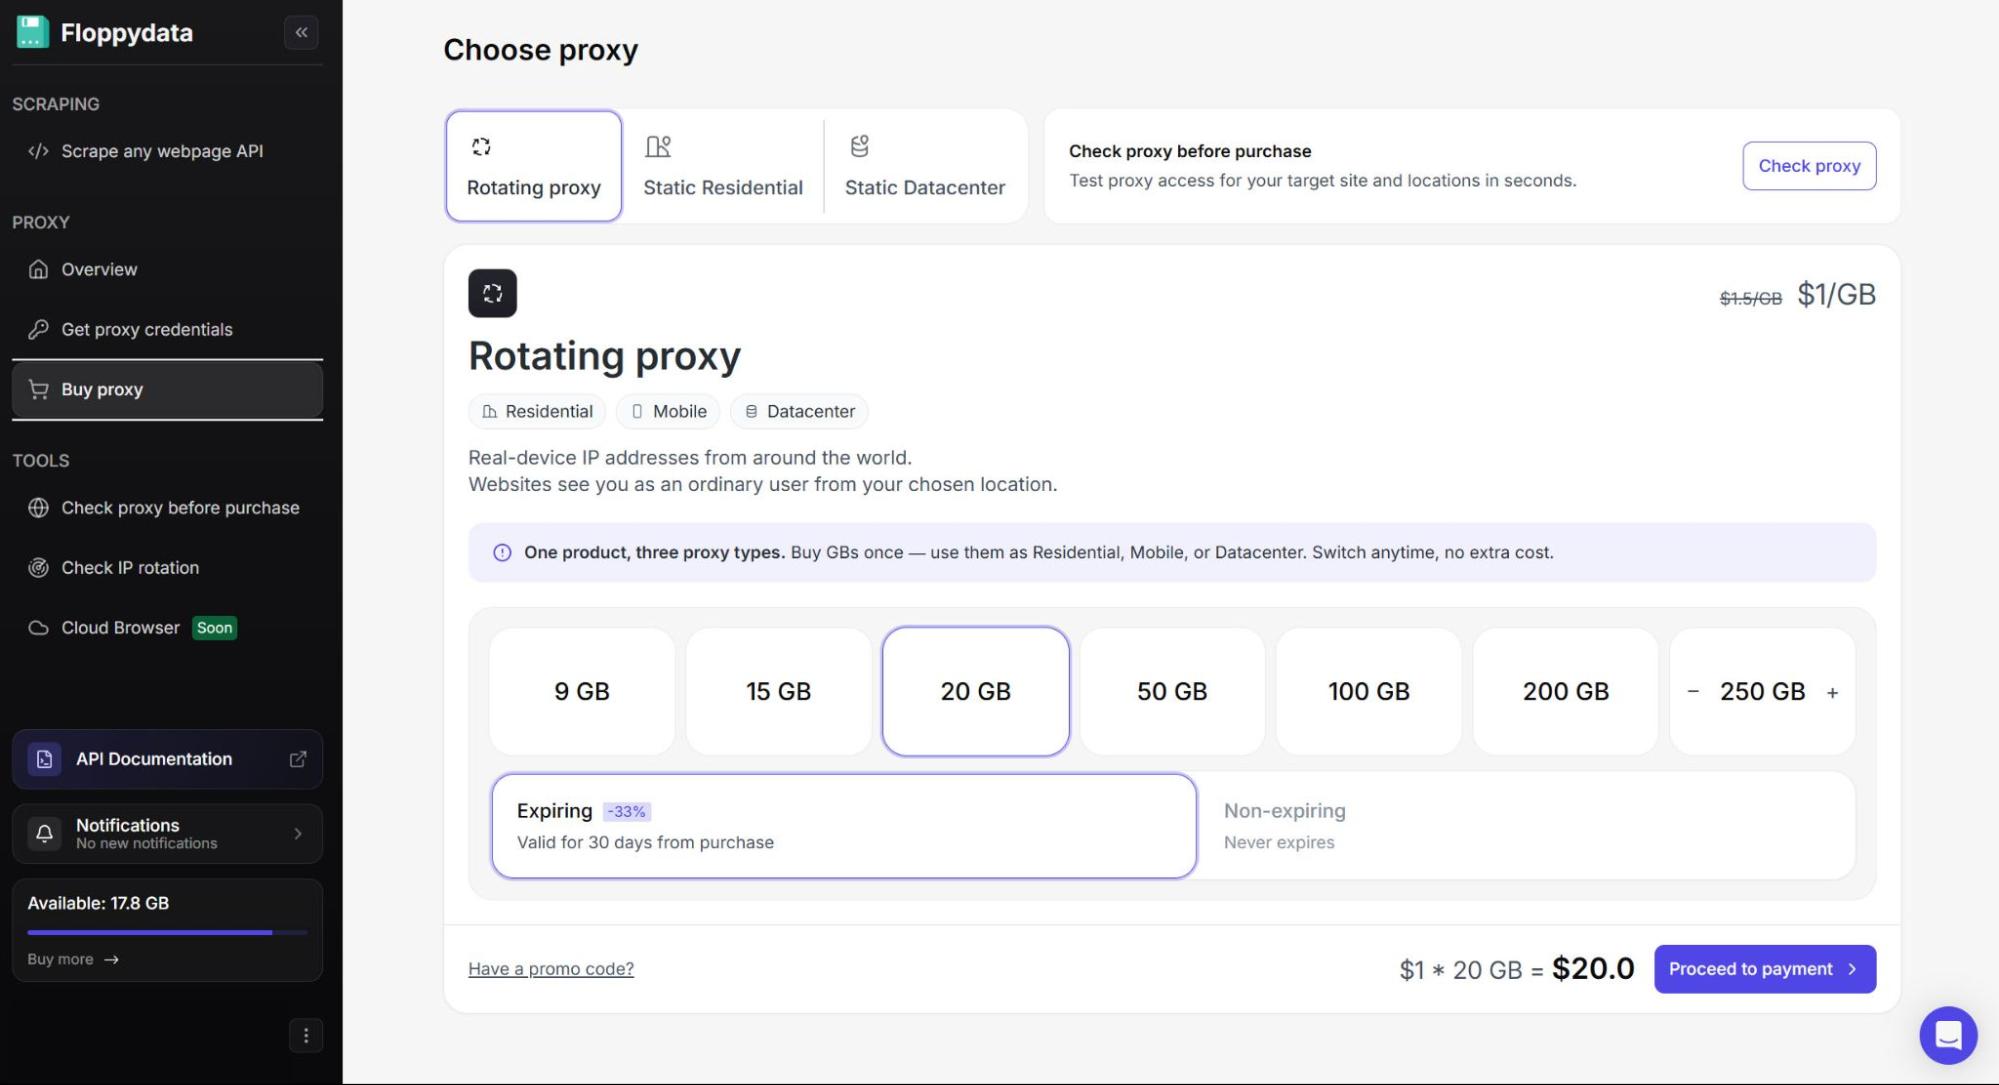
Floppydata offers three proxy types to choose from:
- Rotating proxy includes datacenter, mobile, and residential IPs, which you can use at your own discretion, paying only for the traffic ($1/GB).
They would be best fit for bypassing strict geo-restrictions and accessing websites where regular IP changes are key, such as e-commerce. However, Floppydata also offers sticky sessions, which will hold the connection to one proxy for as long as possible, making them appropriate for many other use cases. If you’re up against a sophisticated anti-bot system, residential and mobile proxies are the way to go.
- Static Residential (ISP) proxies offer stable connection and high speeds of datacenter ranges, while providing great trust scores of residential IPs.
These are a great option for fintech services or large e-commerce and streaming platforms, since these websites employ advanced anti-bot systems and require you to stay logged into your account as long as possible.
- Static Datacenter proxies provide the best connection speeds while keeping you connected to one IP. They are great for gaming, as well as for websites with lenient protection systems and basic account management, such as web forums.
Step 2: Once you’re done with your purchase, head on over to the Get proxy credentials tab in the left menu. This is where your proxies get configured – sounds complex but, actually, far from it. All you need to do is choose the desired credentials from their respective drop-down lists.
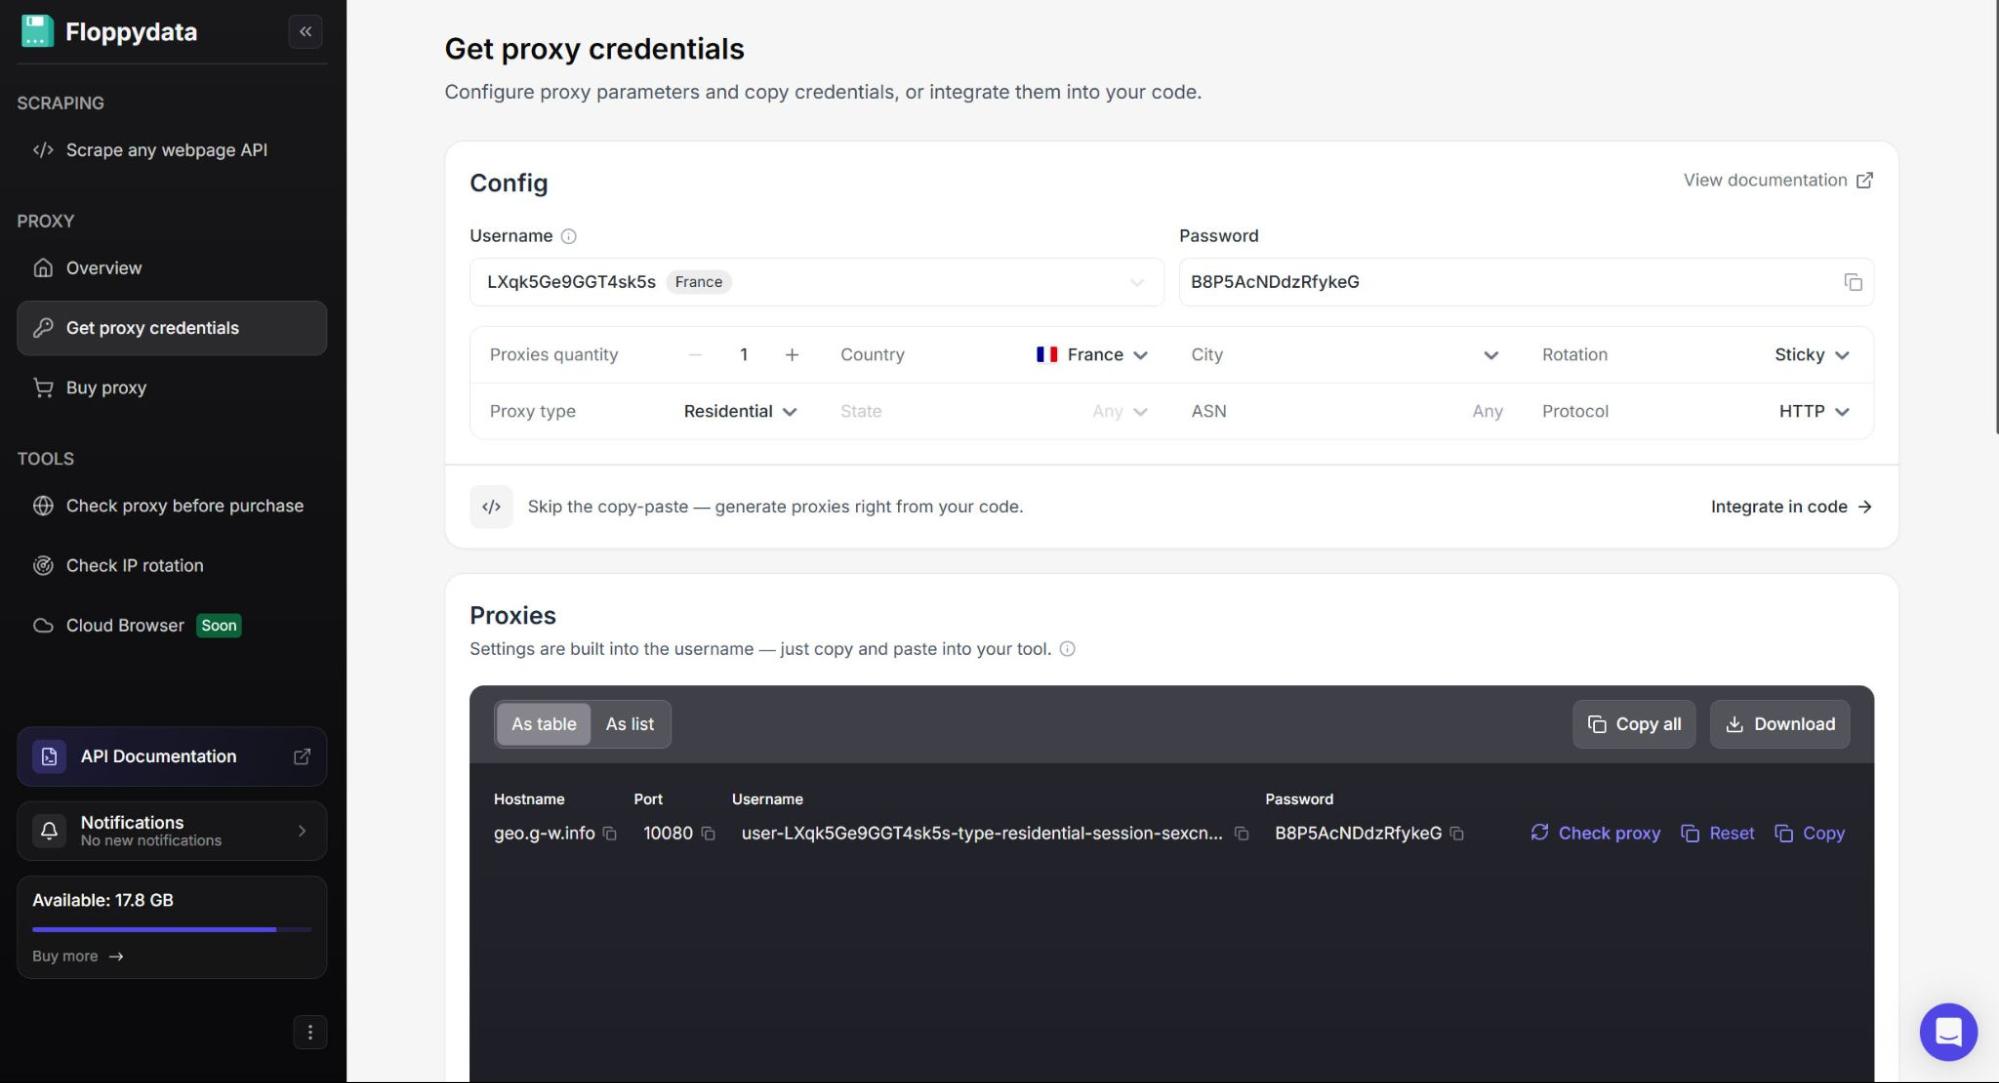
From there, all your proxy credentials are already embedded into the proxy string which you can find in the gray box under Proxies.
Now, all there’s left to do is connect your proxies to your device. There are 2 possible methods for this.
Proxy Manager Extension
I usually go with this method, as, once you set the proxies up, it’s a quick and convenient way to connect to your IPs while also keeping them in sight for easy management.
Step 1: On the Chrome Web Store, find any proxy-managing extension and click Add to Chrome – there are a plethora of choices, I personally use FoxyProxy.
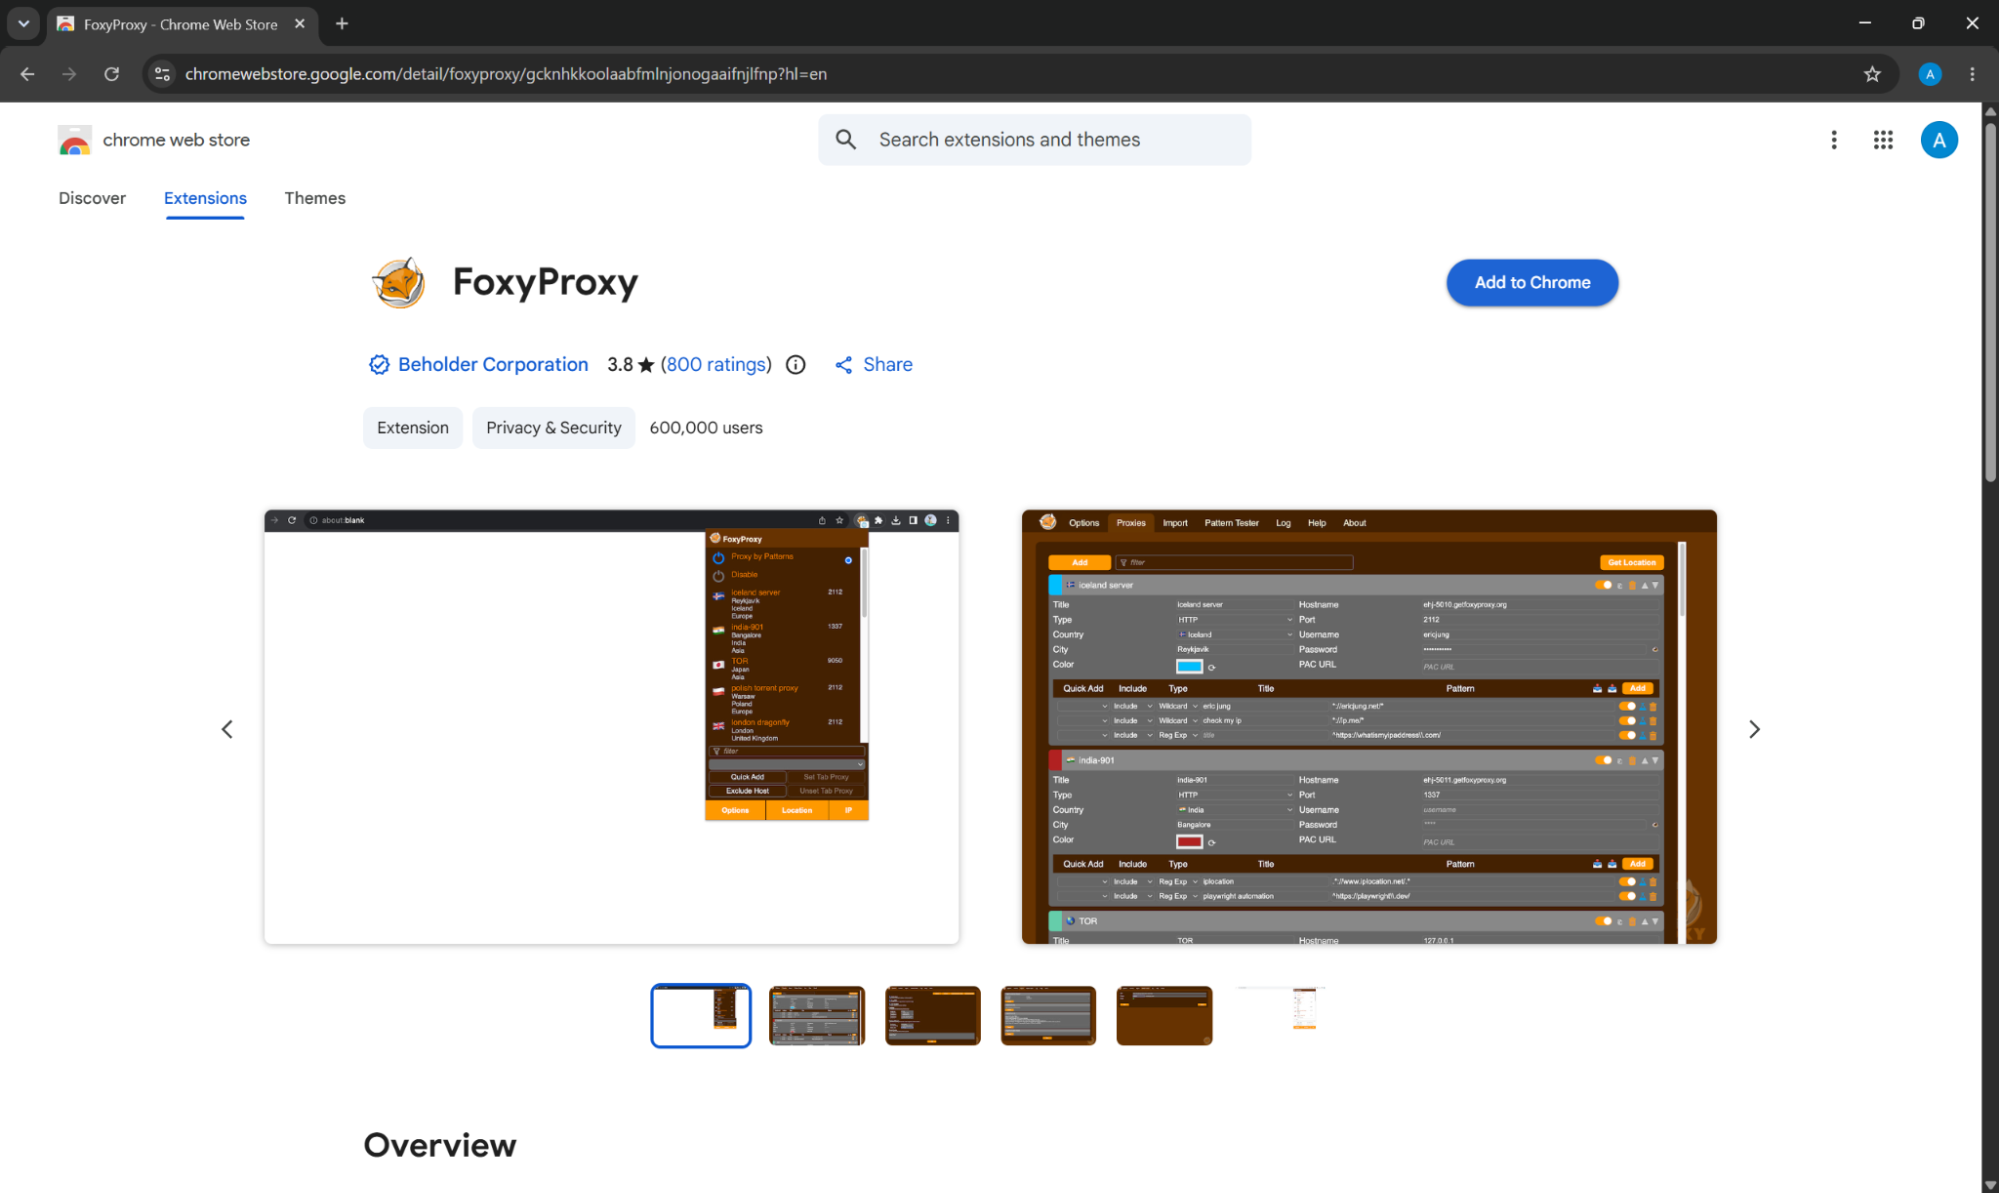
Step 2: Once the extension is added, you can find it in the top right corner of the browser inside your extension manager. First, click on the FoxyProxy’s icon and go to Options.

Step 3: There, go to the Proxies tab and click Add. On the right of the newly appeared field, you will see several sections labeled Hostname, Port, Username, and Password. Simply copy those credentials off of Floppydata’s dashboard and paste them in the respective fields, then click Save.
To connect to your proxy click on the extension again and choose one of the saved IPs.
System Set Up
If you want to connect your proxies right to your device, here is how to do it.
For Windows:
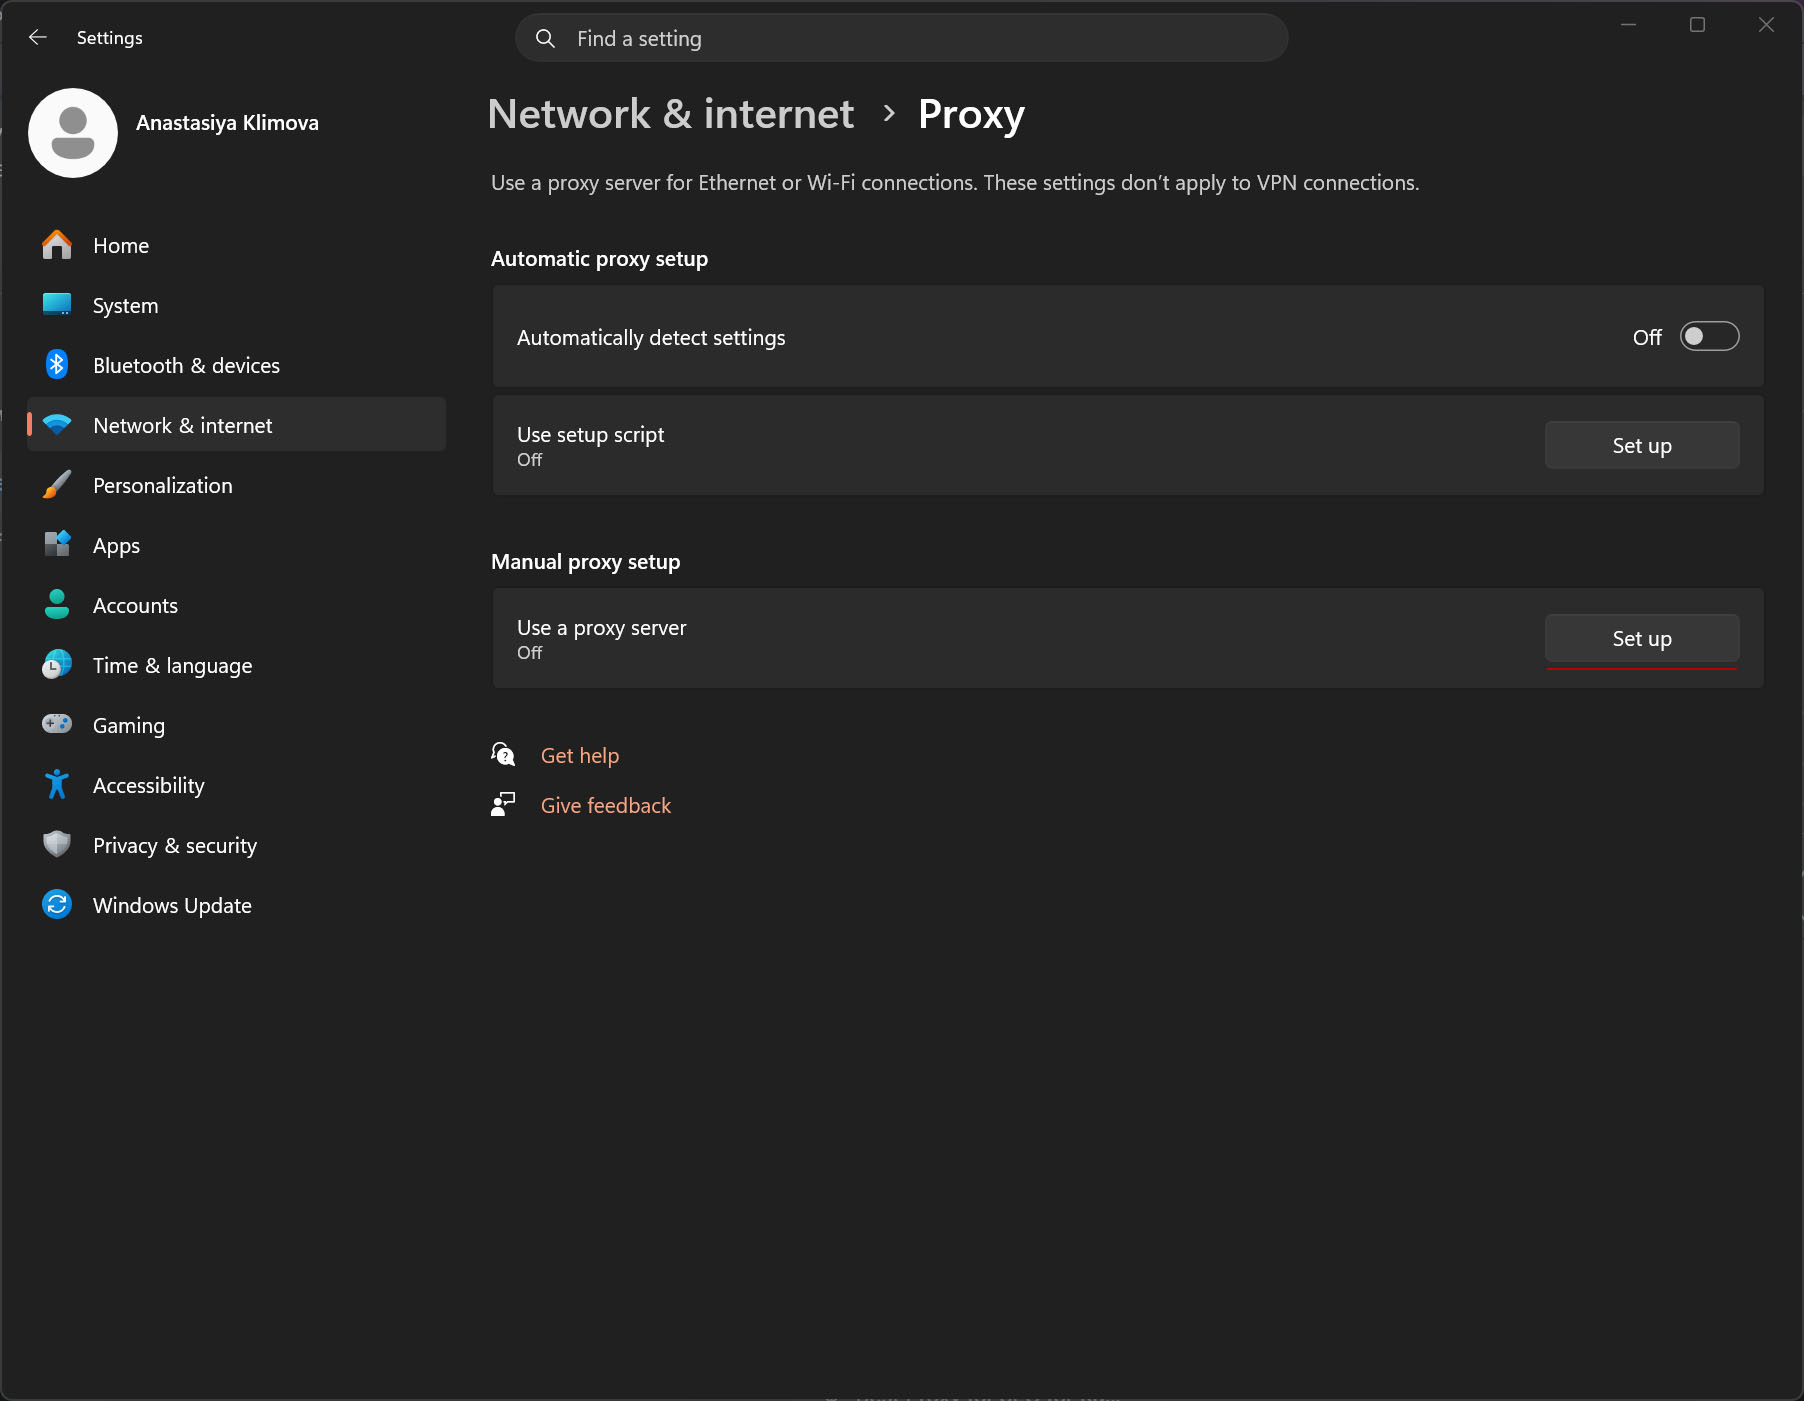
Step 1: Go to your device’s Settings and click the Network & internet tab on the left menu, then choose Proxy. Under Manual proxy setup, click on the Set up button.
Step 2: When the Edit proxy server window pops up, switch the toggle to On, copy Hostname from Floppydata’s dashboard and input it into the Proxy IP address field. Do the same with Port and click Save.
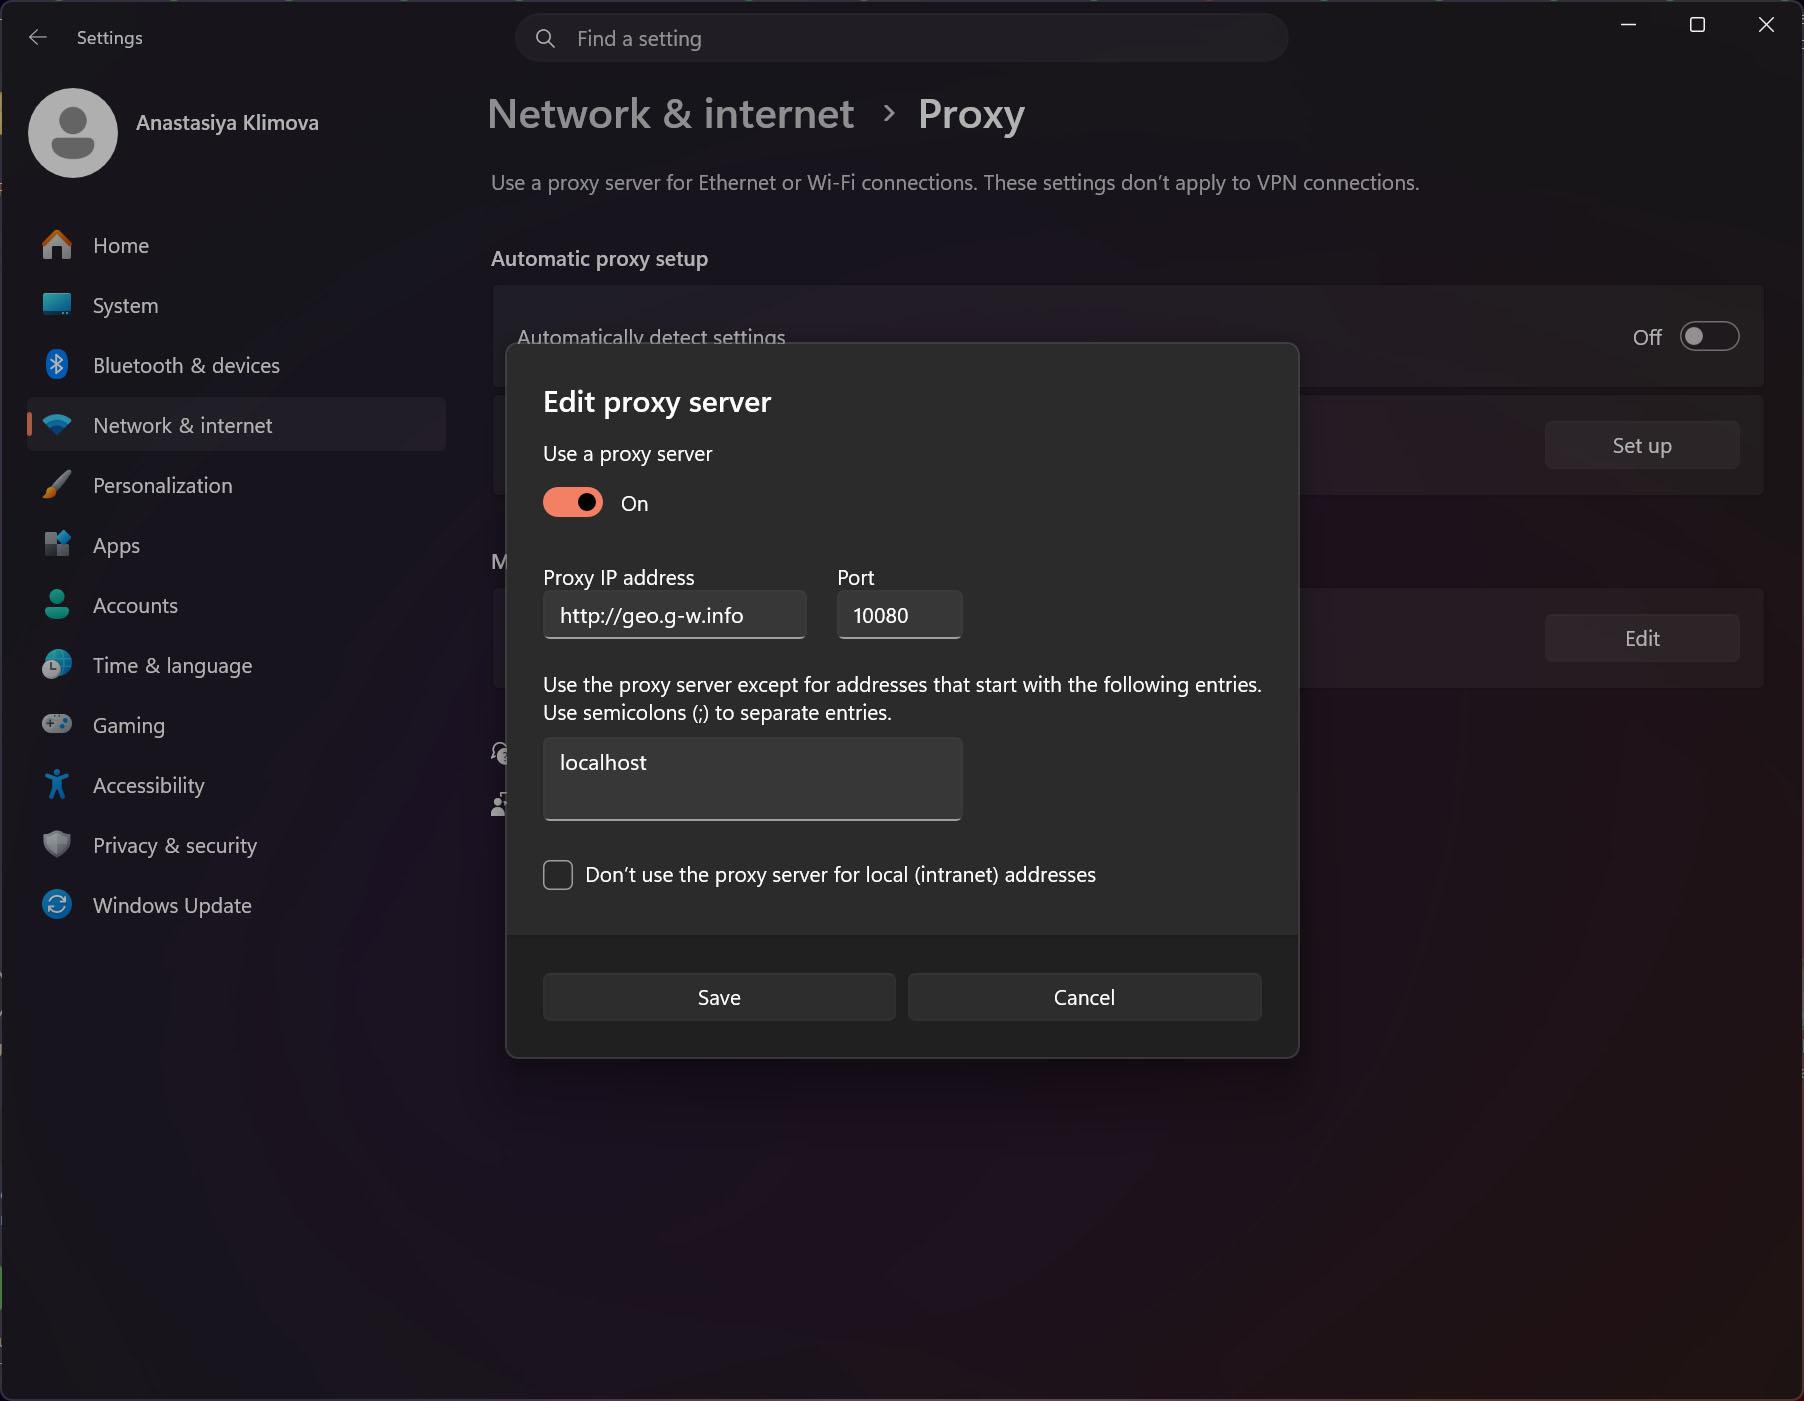
Step 3: Shortly, a new window will appear asking you to input your Username and Password – just copy and paste those credentials from your dashboard and click Ok.
For MacOS:
Step 1: Go to System Settings and select Network in the left sidebar.
Step 2: Choose your active internet connection and click the Details… button next to it.
Step 3: In the pop-up window, click the Proxies tab in the left menu, then toggle the switch to On for Secure Web Proxy.
Step 4: In the newly appeared fields, input Hostname in the Server box and do the same for Port.
Step 5: Lastly, turn on the toggle next to Proxy server requires password, input your Username and Password into the respective boxes, click OK, then Apply to save changes.
Check Your IP
Finally, to check if the proxy connected successfully, you can go to Iphey and run the test.
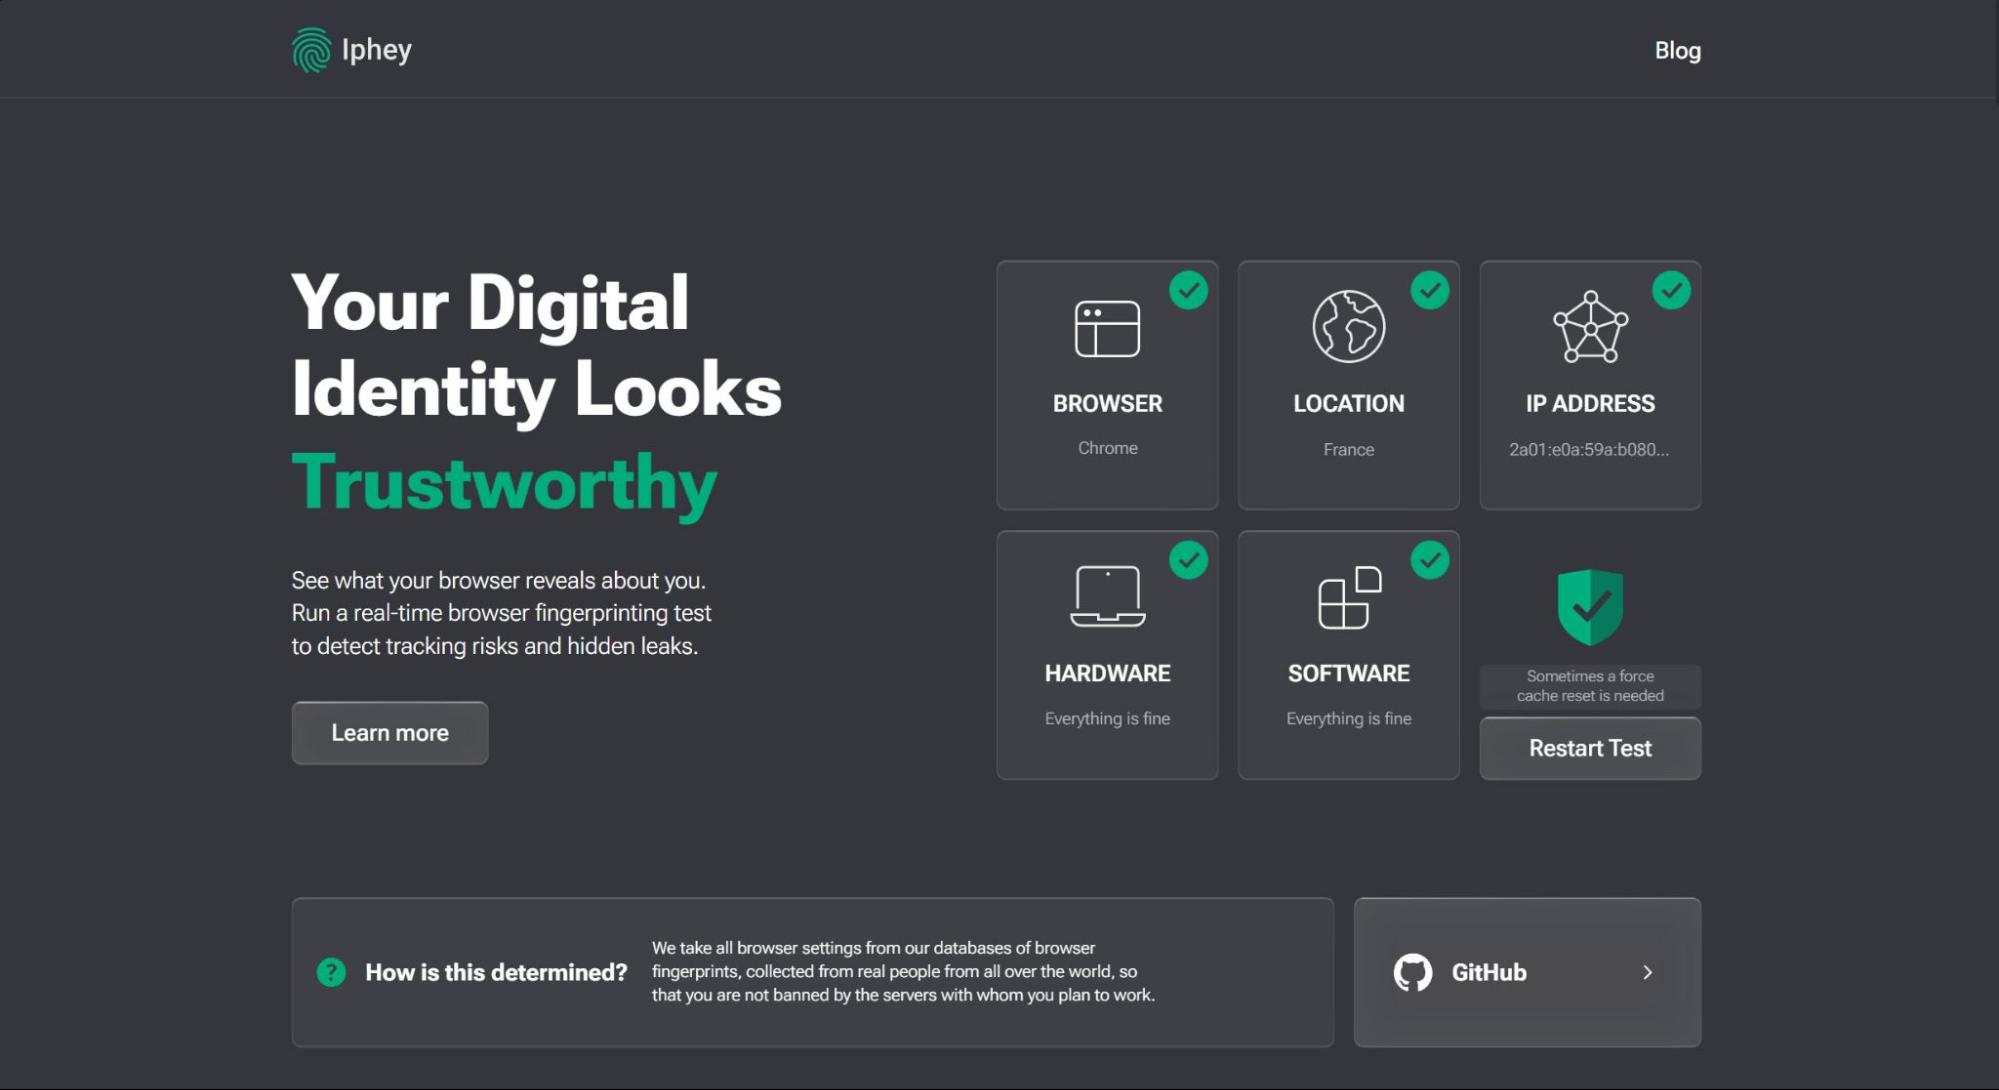
If the location and IP address have changed – you’re all set!
How to Access Banned Sites Using a VPN
VPN services are a widespread circumvention tool that, similar to proxies, connects you to a remote server by routing your traffic through an encrypted tunnel. From said server, you are connected to the destination site, making it seem as if the request came from the VPN provider, not your computer.
While VPN offers a more anonymous approach to browsing, modern censorship models are trained to search for specific markers of a VPN connection and block it. Some governments go even further in their restrictive measures and prohibit the usage of VPNs at the legal level, with netizens facing fines and even prison sentences for employing this circumvention tool. If you’ve decided to go with VPNs for bypassing blocks, I’d strongly advise you to check its legal standing in your country as well as search for a service that supports additional obfuscation technology and employs a No-Logs policy.
Setting up a VPN server is pretty straightforward, follow these steps:
Step 1: Sign up for the service of your liking (ExpressVPN, NordVPN, and Surfshark are among the most popular providers) and purchase a suitable subscription.
Step 2: Next up, you will need to download a VPN client for easy management of your connection. Every large provider has its own application, which you can find on their website – choose your operating system (Windows, MacOS, Linux, so on) and click download.
Step 3: Once the application is downloaded and installed, all you need to do is choose an appropriate server from the list and click Connect. Quick tip: for the best performance and connection speed, choose the nearest country to your location.
Conclusion
Whether you read this article facing a connectivity issue or as a cautionary tale, you now have the exact steps for detecting, dissecting, and fixing any of Chrome’s malfunctions.
In this day and age, circumvention tools have become a crucial part of internet hygiene. Even outside of irregular website blocks, I’d recommend employing these practices to protect your online identity from malicious actors, ensure the safety of your connection, on top of gaining access to the World Wide Web in its entirety. Proxy services, such as Floppydata, are a great tool as they offer outstanding performance and stability for a fraction of the price of VPNs while not posing legal issues.