
Puppeteer is one of the most popular Node.js libraries and a powerful tool for automated tasks such as web scraping, testing, SEO research, or price tracking through Chrome or Chromium browsers. If you’ve ever worked with any automated workflow at scale, you already know the pain – websites rate-limit and throttle your connection, block requests on the spot, or even blacklist your IP entirely.
These complications not only end up costing you precious time and money, but can greatly affect your personal address’ trust score and, in turn, any future online endeavor. Luckily, there is a method that solves these troubles effortlessly, while simultaneously helping bypass geo-restrictions and distribute automated requests for better success rate and connection speed. I am obviously talking about proxies.
In this article, we’ll figure out exactly why you need proxies and which kind your task requires, go over basic configuration, authentication, and protocol importance. Moreover, I’ll recommend a great provider that has been working especially well for my own automation pipelines.
What is a Puppeteer Proxy and Why Do You Need One?
A Puppeteer proxy acts as a middleman between your automated script and the website you’re targeting. By routing your requests through the provider’s dedicated server, proxy hides your real IP address, making it so the target site sees the proxy’s IP, not yours.
Still, IP masking is just the tip of the iceberg. Here’s a full list of benefits a proxy adds to your Puppeteer workflow:
- Avoiding IP bans, rate limiting, and throttling: Websites often restrict access to IPs that make a large amount of consecutive requests. If not outright blocked, your connection may be heavily slowed down or bombarded with CAPTCHAs. A well-configured pool of rotating proxies solves this problem – even if one of your IPs gets banned, another one gets in its place to ensure uninterrupted workflow.
- Bypassing geo-restrictions: A big part of internet content is hidden behind geographic restrictions or otherwise altered based on the location the request is coming from. Residential proxies allow you to acquire an address from anywhere in the world with pinpoint precision (specific states, cities, or zip-codes) and browse as if you’re physically in that region.
- Improving success rates of requests: Distributing requests across a proxy pool dramatically reduces failed connections and timeouts, especially on aggressive scraping tasks.
This becomes extremely useful, if not crucial, in:
- Web scraping at scale
- Ad verification
- SEO monitoring
- QA and testing
- Localization
In short, if you’re running Puppeteer for anything beyond a simple one-off test, proxies are non-negotiable – a high-quality proxy network is often the difference between a fragile script and a reliable data pipeline.
Puppeteer Use VPN vs. Proxy: Which Should You Choose?
When talking about circumvention tools, without fail one question always arises: what’s better, proxy or a VPN? Both have their own strengths and weaknesses, both will yield amazing results if used correctly and for an appropriate use case. Since in this article we’re focusing specifically on Puppeteer automation, let’s review which tool fits Puppeteer workflows better.
From the user’s perspective VPNs and proxies are quite similar – both mask your IP by giving you a new one. However, this is where the similarities end. VPN routes all traffic from your device through an encrypted tunnel to connect you to the provider’s server. From there, you can browse the entire web at your discretion.
Proxies, on the other hand, hide your IP from just one website or application (the one you’re connecting to) at a time while the encryption is controlled by the chosen protocol – HTTP provides no encryption, HTTPS is used for basic encryption, and SOCKS5 for maximum encryption.
Why it matters?
These two main differences are what sets the circumvention tools apart the most when it comes to putting them to use. VPN’s encryption makes it a great fit for personal online privacy and anonymity, whereas proxies’ lower overhead allows them to maintain high speeds and handle massive amounts of user traffic simultaneously. Additionally, by routing all of your traffic, VPN is able to provide you only one IP at a time, while proxies offer as many concurrent connections as you desire.
Here’s a comparison table for better visualisation:
| VPN | Proxy | |
| IP masking | Yes | Yes |
| Encryption | Yes, all device traffic | Only with SOCKS5 protocol, per-website/per-app |
| Speed | Medium | High |
| Concurrent connections | One IP at a time | Multiple simultaneous IPs |
| Rotation control | Limited | Built-in |
| Geo-targeting precision | Limited (country-level) | City, state, zip-code, ASN-level (depending on the provider) |
| CAPTCHA/block handling | Manual intervention needed | Handled by auto-rotation |
| Scalability | Limited | Highly scalable |
| Best for | Personal use | Automation at scale |
Although VPNs can potentially be integrated in your Puppeteer script, the outcome of this venture is far from ideal. In other words, VPNs are better suited for individual browsing, while proxies are designed specifically for automation, scraping, testing, and data collection at large scales.
How to Use a Proxy in Puppeteer: Basic Setup with Floppydata
Now, let’s move onto the proxy configuration and Puppeteer integration section of the article. To help me with the set-up and proxy demonstration, I’ll be using Floppydata.
Floppydata has been my go-to proxy provider for a while now. The service provides consistent 99.99% uptime and high trust scores, offering uninterrupted connection for any automated pipeline. On top of amazing performance, Floppydata offers one of the best prices on the market – just $1/GB for rotating IPs and $5/IP for ISP proxies. This makes the service a perfect fit for users running large-scale/data-heavy operations while being conscious of their budget.
The first step of integrating proxies into your Puppeteer script is acquiring a proxy. With Floppydata it takes just a couple of clicks.
After signing in, you will access Floppydata’s dashboard. Firstly, choose a suitable plan and proceed to payment. For automation workflows I recommend the “Rotating proxy” plan, which includes three types of IPs (residential, mobile, and datacenter) you can switch between at your own convenience.
The next steps are as easy as it gets, even if you’re not well-acquainted with proxy services, Floppydata’s clean interface ensures you won’t get lost.
Navigate to the “Get proxy credentials” tab on the left sidebar. There, you will be given a username and an associated password for your account, but for the sake of this demonstration, let’s create a designated profile for Puppeteer – this will generate a new proxy with authentication already built-in. As you can see, you can create as many separate subusers as you’d like, which greatly simplifies further management processes.
Then, simply choose the needed parameters from the presented drop-down lists. As you’re filling in the details, they are being simultaneously embedded into the proxy string. Once you’re happy with the parameters, you can simply copy a code snippet or the proxy string.
For this demo, let’s focus on how the basic setup works with a proxy string. Here’s a code snippet for one proxy integration:
Puppeteer proxy with authentication – page.authenticate method
Install:
Basic Setup:
Once the code is set up, simply copy and paste your proxy credentials from Floppydata’s dashboard into their respective places – your username (the entire string we copied on the GIF above) in the PROXY_USER, password in the PROXY_PASS. PROXY_SERVER follows a simple hostname:port format, where hostname is geo.g-w.info and port ranges are defined by the chosen protocol – 10080 for HTTP, 10443 for HTTPS, and 10800 for SOCKS5.
This method also includes native authentication, supporting both HTTP and HTTPS – input your username and password under page.authenticate to integrate your proxy with authentication straight away, no extra setups and new pages needed.
Proxy-chain authentication
Another method of proxy authentication, used mainly for custom error messages, custom responses, and measuring traffic statistics or if you need to embed credentials directly in the proxy URL, is proxy-chain npm package. The crucial part of this method is anonymizeProxy(proxy), which starts a local proxy server.
Install:
Setup:
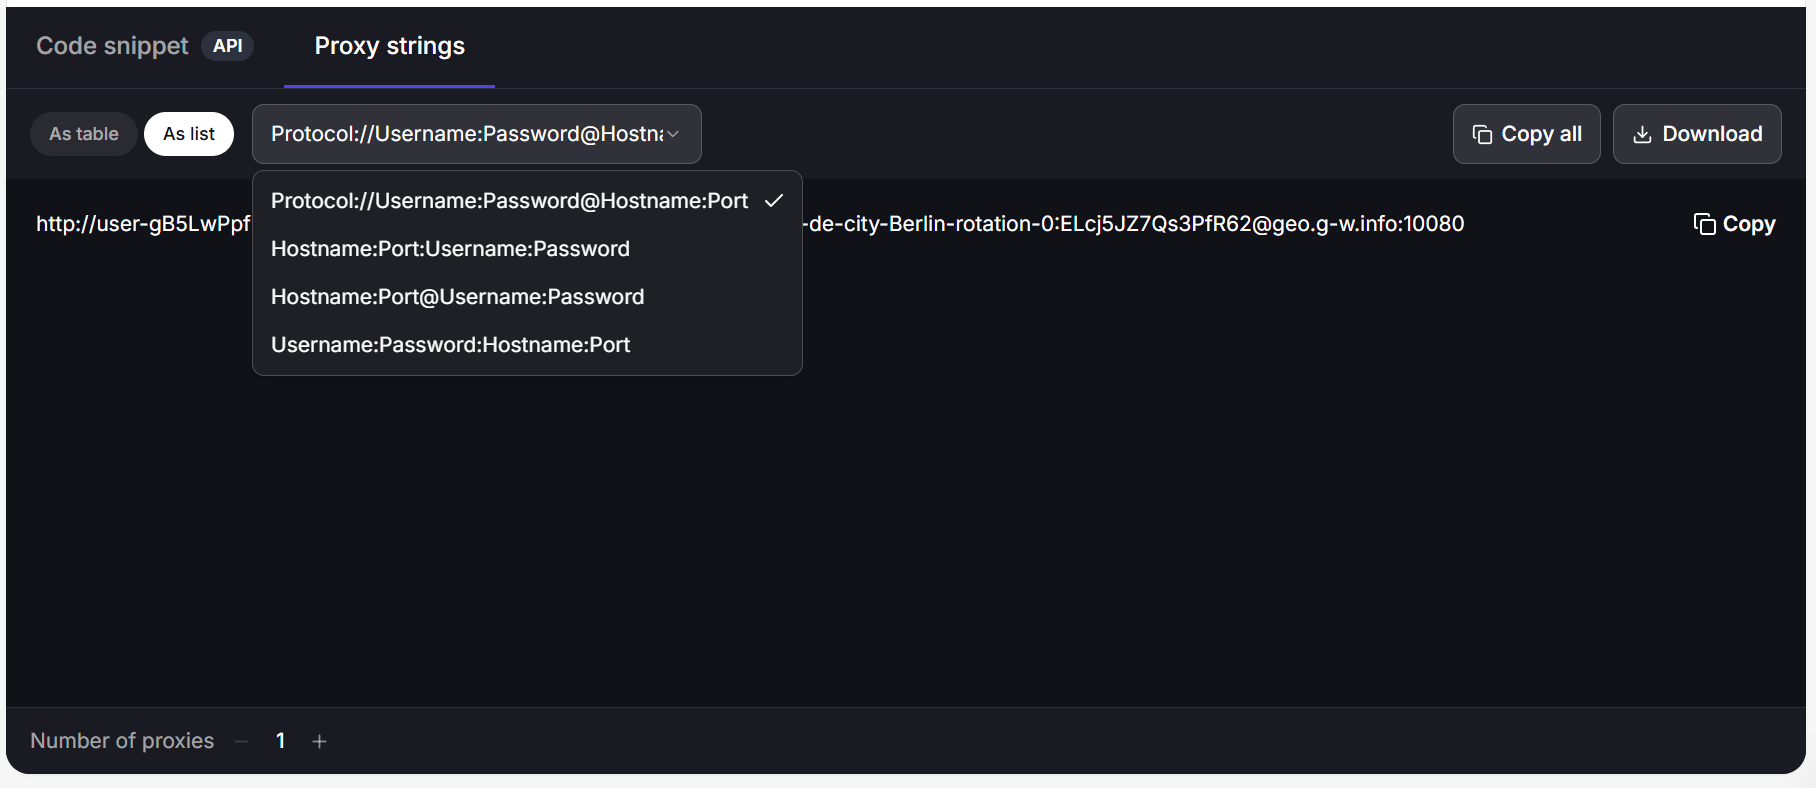
For this method you will need the same credentials as before, plus your proxy URL in the following format Protocol://Username:Password@Hostname:Port. You can find a ready-to-use string on Floppydata’s dashboard right under the proxy configuration – click “Proxy strings,” then “As list,” and choose the format from the ones presented in the dropdown list.
Use Proxy with Puppeteer at Scale: Puppeteer Proxy Integration Best Practices
Once your basic proxy setup is working, you can move onto expanding your pipeline for production. Here, a single static proxy won’t cut it, let’s see how to set up a rotating proxy pool in Puppeteer.
Random rotation
Install:
Setup:
As you can see, the main difference here is that instead of PROXY_USER we’re using PROXY_POOL. Simultaneously, we’re adding a randomized rotation logic through Math.floor(Math.random() * PROXY_POOL.length).
Sequential rotation
Install:
Setup:
Here, we’re using a getNextProxy() function which uses a proxyIndex counter with a modulo operator (%) to loop through the pool in order.
Puppeteer SOCKS Proxy: What You Need to Know
Socket Secure (SOCKS) protocol, and SOCKS5 proxies specifically, operate at a lower network level than HTTP/HTTPS proxies. What sets them apart from other protocols is the ability to handle any type of traffic, from standard web browsing to email, file transfers, P2P connections, and real-time data streams. This is made possible because SOCKS protocol doesn’t interpret or filter your traffic like HTTP proxies do, it simply passes raw TCP and UDP packets without any modification. On top of this, SOCKS5 proxies provide the maximum level of encryption that the proxy layer itself can provide.
In the context of Puppeteer, SOCKS5 proxies have a couple of distinct advantages. Its low-level packet forwarding means fewer errors and lower latency under heavy loads, which helps greatly in running large-scale scraping pipelines. Since Puppeteer can interact with a wide range of tasks beyond standard web browsing, including handling media, WebSocket connections, and non-HTTP traffic, SOCKS5 proxies are a natural fit, thanks to their ability to handle multiple protocols rather than being limited to web traffic alone.
However, there is a catch. Puppeteer’s engine, Chromium, does not natively support SOCKS5 proxy authentication that most commercial proxies, Floppydata included, require. Attempting the regular page.authenticate method will most likely result in ERR_NO_SUPPORTED_PROXIES or the browser falling back to a direct connection, exposing your real IP.
Still, SOCKS5 IPs can be integrated in your Puppeteer script and authenticated through the proxy-chain method. proxy-chain works here because it spins up a local HTTP tunnel that handles the SOCKS5 authentication on your behalf; Chromium never has to deal with it directly. The setup in this case looks a little different:
Install:
Setup:
It’s important to note that in this case PROXY_PORT changes to 10800 for SOCKS5 protocol and the proxy itself starts with socks5:// not http://.
Conclusion
Proxies are an essential part of any serious Puppeteer automation setup. In this guide, we covered the core reasons to use them, how they compare to VPNs, and walked through every major integration method – from basic authentication to rotating pools and SOCKS5 configuration with proxy-chain. With a reliable provider like Floppydata and the right setup for your use case, you’ll have a resilient, scalable pipeline that can handle whatever your workflow demands.