Scrapy requires a greater degree of technical knowledge than no-code web scraping tools. However, it makes up for this with impressive customizability, smooth database and API integration, and middleware that expands its abilities even further.
Even so, Scrapy is only as effective as the anti-detection measures you use it with. Many websites will swiftly block your scraping attempts if your requests don’t appear trustworthy and mimic the behavior of actual users. Access via different IPs through proxies is essential for this, not to mention scraping websites with geo-restrictions.
This comprehensive guide will show you how to set up FloppyData proxies with Scrapy and unleash its full potential.
NOTE: Our guide focuses exclusively on getting Scrapy to work with proxies. However, you can read up on specific scraping workflows, check out tutorials, and uncover in-depth insights into every aspect of Scrapy by consulting its extensive documentation.
What Is Scrapy?
Scrapy is a versatile Python framework designed for both simple and advanced scraping operations. It supports custom logic, meaning you can set up different web crawling, data parsing, and error handling methods. Web scraping works asynchronously, allowing for the simultaneous use of several spiders, modular classes that define how to crawl sites and extract data.
You can specify which selectors to use to minimize the amount of HTML Scrapy has to crawl through. It supports CSS and XPath selectors as well as regular expressions.
Best of all, Scrapy is free and open-source. It has thorough, up-to-date documentation and an active community responsible for maintenance and development.
Installing Scrapy and Creating a Project
Since Scrapy is a package that doesn’t come with your Python installation, you’ll need to install and configure it separately. If you’ve not used Python before, the first thing to do is to install it and make sure that both Python and its package manager PIP are accounted for..
To do so, open a terminal, IDE, etc., and run these two commands:
python --versionpip --versionIf both are displaying their respective versions correctly, you can install Scrapy by running:
pip install scrapy
Starting a new project
Proxies work on a per-project basis, so let’s learn how to create one! For the purposes of this guide, we’ll set up a project that returns your original IP address from HTTPBin and then add FloppyData’s residential proxies to hide that IP.
The syntax for starting a new project is:
scrapy startproject <project name>
If we call the project IPtest, the command should read:
scrapy startproject IPtest
This creates a new folder called IPtest inside the one where you executed the command and populates it with core project files. We’ll need to modify some of those later.
Creating a spider
Go ahead and create your first spider. Here’s the template:
scrapy genspider <name> <domain_url >
If we name the spider myIP and specify HTTPBin as the target URL, the command should look like this:
scrapy genspider myIP httpbin.org
You’ve also created a spiders folder inside your project folder that contains the myIP.py spider. You can add multiple spiders if you need to scrape a site with different logic or want to distribute the workload on large websites. We’ll stick to one for now.
Modifying the spider
The default Scrapy spider created in the previous step doesn’t come with all the commands necessary to test your IP. Edit it by navigating to the spiders folder in your project and opening myIP.py. Here’s what you should see. We’re using Sublime Text, but any text editor will do.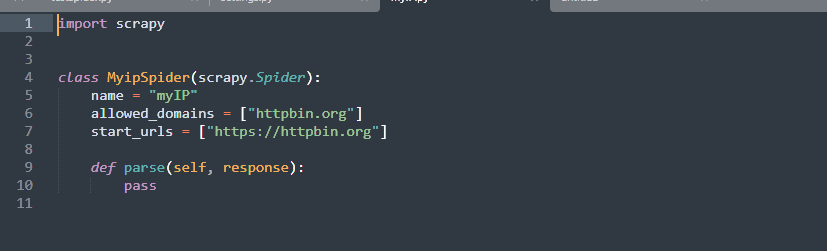
Make the following edits or copy-paste the provided code.
class MyipSpider(scrapy.Spider):
    name = "myIP"
    allowed_domains = ["httpbin.org"]
    start_urls = ["https://httpbin.org/ip"]

    def start_requests(self):
        for url in self.start_urls:
            yield scrapy.Request(
                url=url,
                callback=self.parse,
            )
def parse(self, response):
    print(response.text)
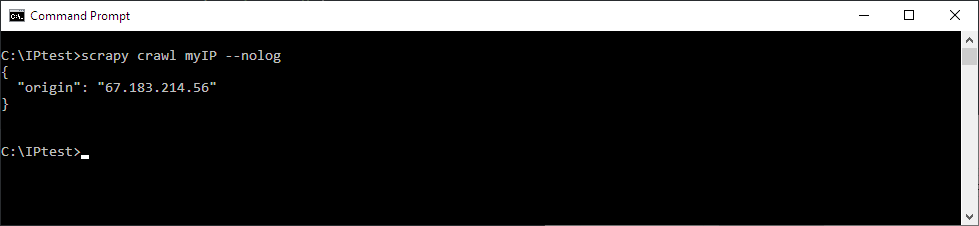
Running the spider will now scrape and return your actual IP address from HTTPBin. The command for that is:
scrapy crawl <spider_name>The output also contains log information. We’re going to suppress it by adding --nolog to the end of the command:
scrapy crawl myIP --nolog
Here’s the result of running the command in Windows Command Prompt.
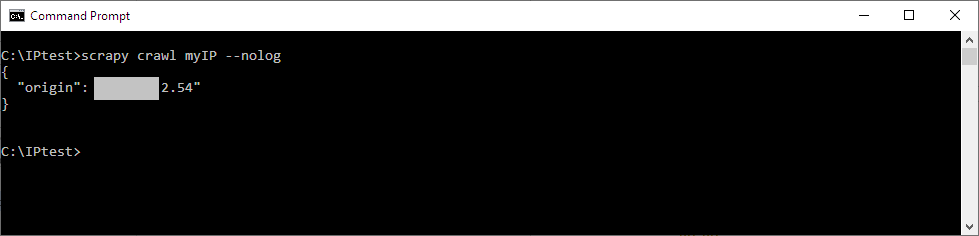
Make sure you’re in the project folder first, though! Our IPtest project folder is directly on drive C. Yours might be in a subfolder or different drive, depending on where you first created the project.
Enabling FloppyData Proxies in Scrapy
Before proceeding, you’ll have to obtain the required information from FloppyData. Make a new account or sign into an existing one. If you don’t already have any proxies, click Create proxy pool on the dashboard.
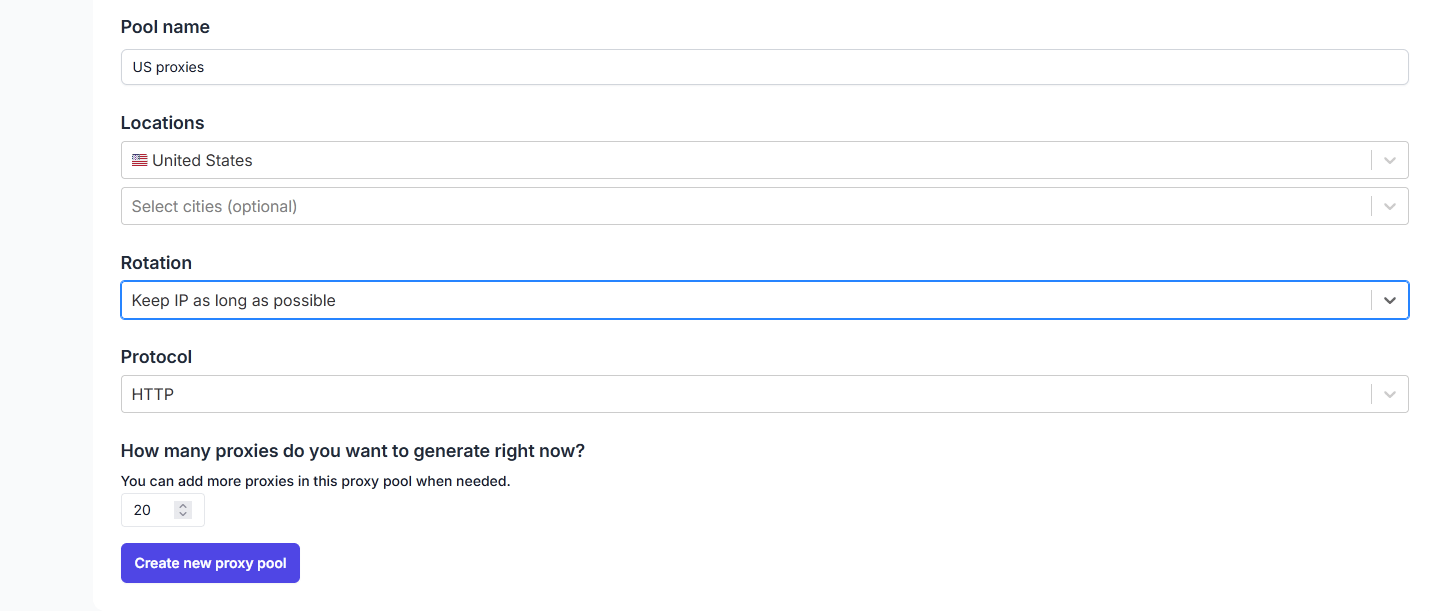
Name the pool and specify its location, session length, and protocol. While you’ll be using a single proxy for now, it’s best to generate several so we can rotate them later. Click on Create new proxy pool. Back on the dashboard, select View proxy pool for the desired pool.
Method 1: Adding a proxy via request parameters
There are two ways to set up individual proxies in Scrapy. The first and most straightforward is to edit each spider with a request parameter containing specific proxy information. The format is the same whether you’re using residential or datacenter proxies.
Open the myIP.py spider again. Add the following line to the yield scrapy.Request block:
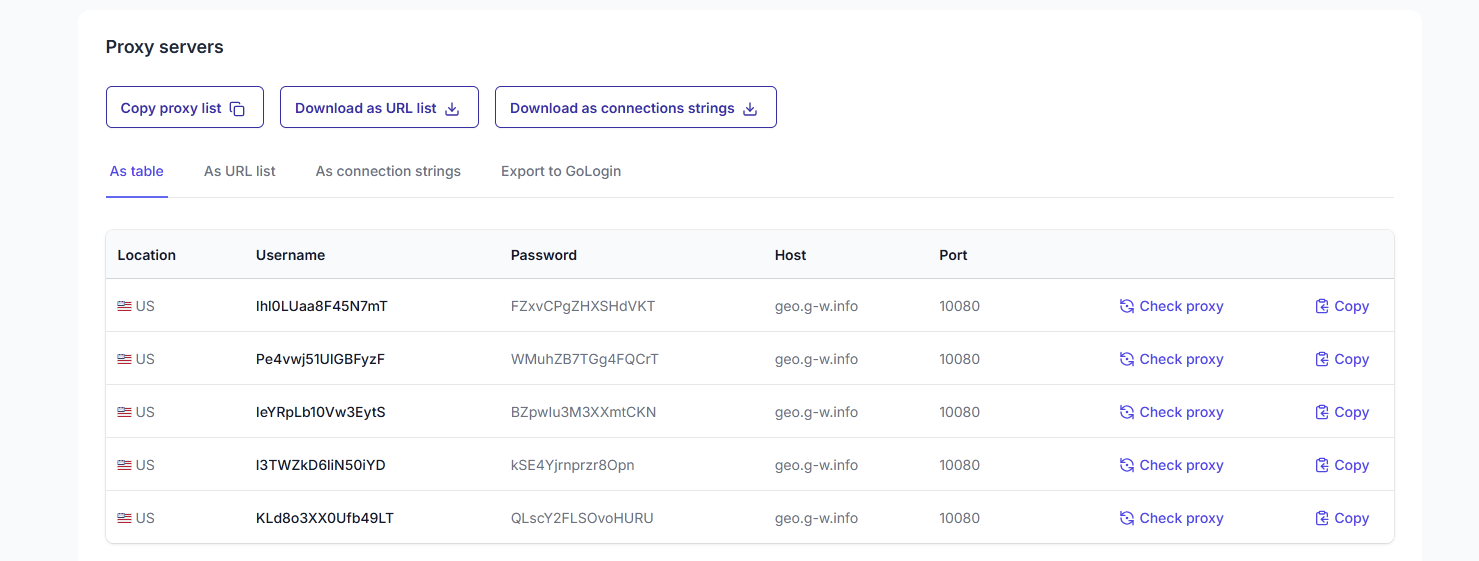
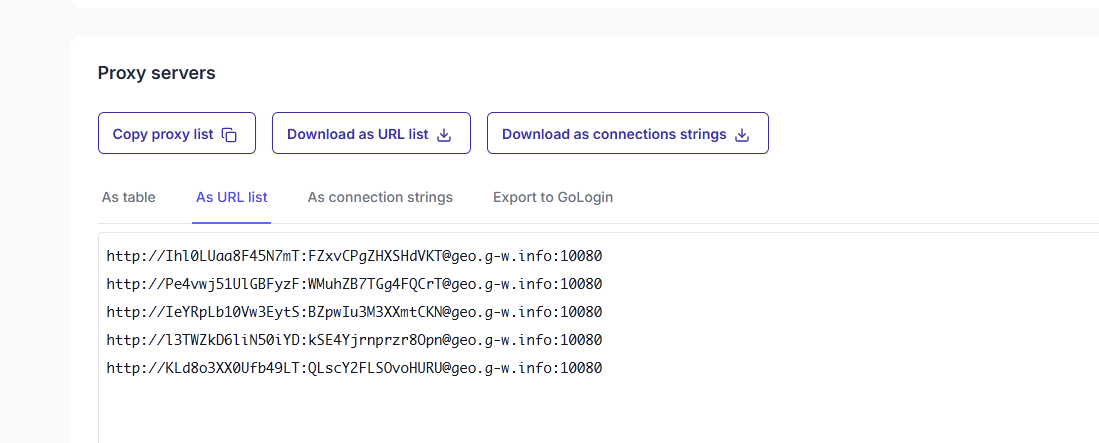
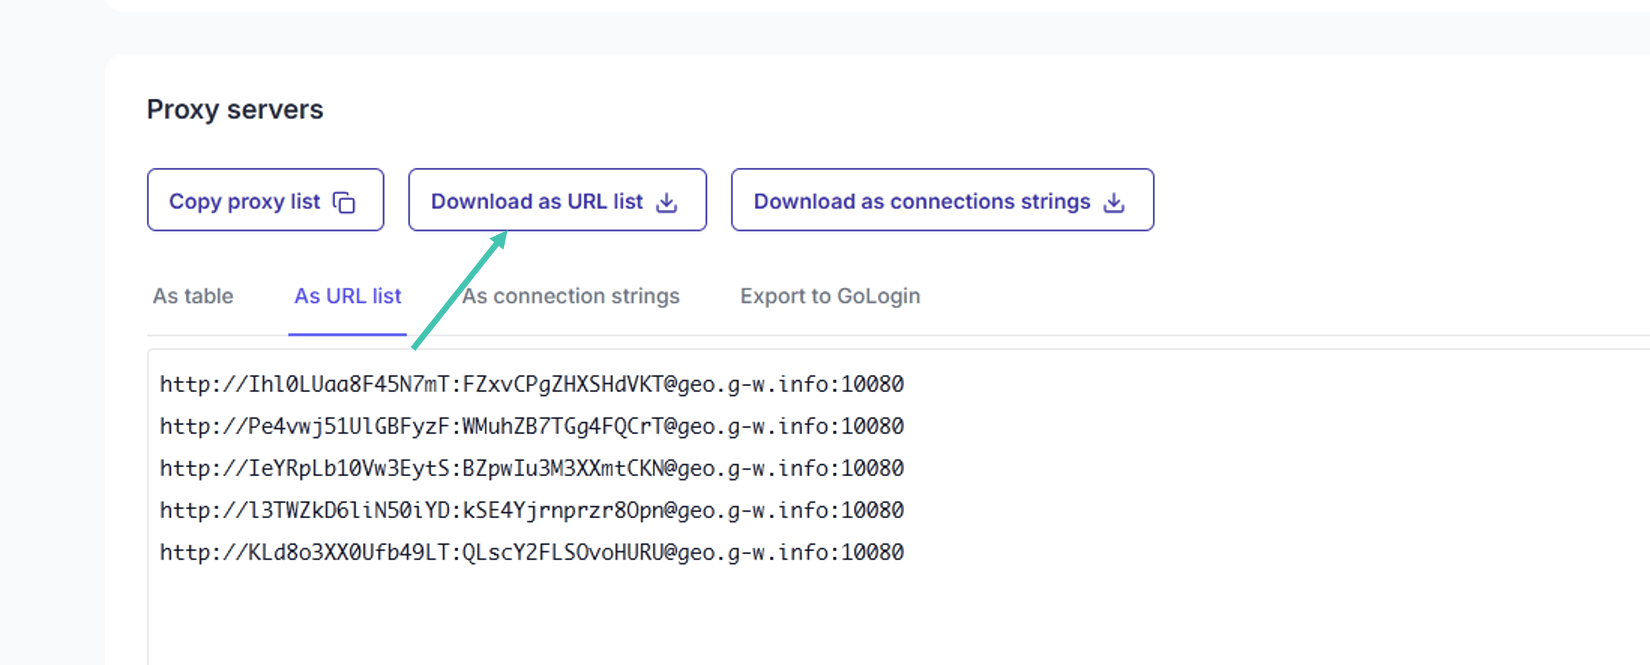
meta={"proxy": "http://username:[email protected]:10080"},Replace the username:password bit with your FloppyData credentials. The easiest way to get the right format is to go back to your proxy pool overview and click on the As URL list tab. This will display the correct copy-paste format.
Our myIP.py spider now looks like this:

Running the scrapy crawl command again returns a different IP, meaning that the FloppyData integration was a success.
Method 2: Introducing proxies through middleware
Assigning proxies to individual spiders works, but it’s inefficient. Luckily, Scrapy lets you set up middleware that governs the proxy behavior for all spiders. It’s convenient for situations when you’re using multiple spiders and have to change proxy parameters just once instead of addressing each spider.
Plus, middleware is the prerequisite for setting up rotating proxies. We’ll get to them shortly.
For our proxy middleware to work correctly, we need to edit two files. Start by adding a new class to the middlewares.py file in your project folder:
class IptestProxyMiddleware:
    @classmethod
    def from_crawler(cls, crawler):
        return cls(crawler.settings)

    def __init__(self, settings):
        self.username = settings.get('PROXY_USERNAME')
        self.password = settings.get('PROXY_PASS')

    def process_request(self, request, spider):
    host = f'http://{{self.username}}:{{self.password}} @geo.g-w.info:10080'
        request.meta['proxy'] = host
This establishes the middleware that ensures Scrapy routs all requests through a FloppyData proxy. However, we still need to register IptestProxyMiddlewareand set up its username and password parameters inside the project’s settings.py file.
Open settings.py and add the following code:
PROXY_USERNAME = 'yourusername'
 PROXY_PASS = 'yourpassword'

 DOWNLOADER_MIDDLEWARES = {
     'IPtest.middlewares.IptestProxyMiddleware' : 100,
     'scrapy.downloadermiddlewares.httpproxy.HttpProxyMiddleware' : 110,
        }
Replace yourusername and yourpassword with your real FloppyData credentials. Scrapy will now run the custom proxy middleware you wrote. The numbers at the end indicate priority, meaning the proxy middleware will run before others with higher numbers.
The second line in DOWNLOADER_MIDDLEWARES is Scrapy’s standard middleware for running proxy requests and executes right after your custom one.
Augmenting Scrapy with Rotating Proxies
All the commands and edits we’ve discussed so far result in your spiders using one proxy IP. That might be all you need, especially if you’re scraping websites with few protections at rates it won’t find suspicious.
However, many websites use IP blacklisting, CAPTCHAs, and other measures to identify and block scraping requests. Having access to your entire proxy pool rather than just a single IP significantly boosts Scrapy’s success rates. Even if one or more of these IPs eventually get blocked, your spiders can continue working without interruption.
Scrapy doesn’t support rotating proxies out of the box. You’ll have to first install an add-on package called scrapy-rotating-proxies. As before, use:
pip install scrapy-rotating-proxies
After successfully installing the package, open settings.py again and add the desired number of FloppyData proxies, like this:
ROTATING_PROXY_LIST = [
    'http://username1:[email protected]:10080' ,
    'http://username2:[email protected]:10080' ,
    'http://username3:[email protected]:10080' ,
]
Alternatively, you can export all proxies in a pool by clicking on Download as URL list while viewing the pool.
Save the resulting file into your project’s root directory, the one with scrapy.cfg in it. Add
ROTATING_PROXY_LIST_PATH = '/filepath/floppydata-proxies.txt'to the settings.py file. Proxy information in the default FloppyData text file starts with the protocol. You might need to delete this in order for rotation to work correctly. The easiest way to do it is to open the file in a text editor, press Ctrl + H on Windows and Linux or Command + Shift + F on a Mac to enter the find and replace menu.
Enter the protocol (HTTP://, HTTPS://, or SOCKS5://) in the find part and leave the replace part blank. Click on Replace all. The list should now be compatible with Scrapy’s rotating proxies feature.
Now all that’s left is to create a new DOWNLOADER_MIDDLEWARES or alter the one we used earlier to look like this:
DOWNLOADER_MIDDLEWARES = {
'rotating_proxies.middlewares.RotatingProxyMiddleware': 590,
'rotating_proxies.middlewares.BanDetectionMiddleware': 600,
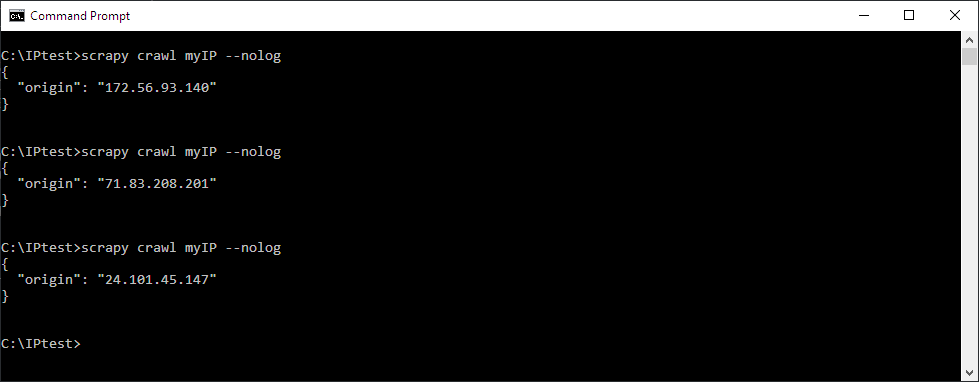
}Finally, it’s time to test these rotating proxies out! Delete the meta parameter in the myIP.py spider first. Then, run the crawl command several times. If you did everything right, each request should return a different IP address.
Conclusion
Extensive scraping customizability, powerful automation capabilities, and a lack of steep licensing fees make Scrapy the ideal framework for users who don’t mind rolling their sleeves up to achieve their data scraping goals. Now that you know how to use Scrapy with premium proxies from FloppyData, you can become one of them.
FAQ
How do I use FloppyData proxies in a Scrapy project?
Create your Scrapy project and spider as usual. In each scraping request, include the proxy details via the meta parameter - this ensures traffic is routed through your FloppyData proxy.
To automate rotation, point Scrapy’s ROTATING_PROXY_LIST_PATH
setting to your FloppyData proxies file for seamless cycling.
Why use proxies with Scrapy and how does FloppyData help?
Using proxies enables Scrapy to avoid IP blocks, access geo‑restricted content, and scrape more reliably. FloppyData’s proxies offer clean residential IPs, easy rotation, and strong flexibility - ensuring your Scrapy spiders look legitimate and avoid detection.