Web scraping is a technique for data acquisition, market research, and competitive analysis. However, scraping websites often requires sophisticated tools and strategies to avoid detection.
In this article, you will learn:
- What selenium is
- Why use proxies for web scraping
- How to set up proxies in FloppyData
- A step-by-step guide to using proxies with Selenium in Python
Let’s dive in!
What is Selenium?
Selenium is an open-source tool designed for automating web browsers. While it supports multiple programming languages, its Python bindings are popular for web scraping and automated testing.
Selenium WebDriver allows you to control a browser, simulating user interactions such as clicking buttons, filling forms, and executing JavaScript. This makes it effective for scraping dynamic websites that rely on JavaScript to load content. Selenium also offers fine-grained control over browser behavior, which is essential for complex scraping tasks.
Why Use Proxies for Web Scraping?
When scraping websites, your scraper sends numerous requests to the target website from a single IP address. This can trigger anti-bot mechanisms, leading to several problems that proxies help mitigate, like:
- Avoiding IP bans and rate limiting: Websites often track request frequency per IP address. Exceeding thresholds can result in temporary or permanent IP blocks, halting your scraping activities. Proxies mask your original IP by routing requests through different intermediary servers, each with its own IP address. Rotating through a pool of proxies distributes your requests, making your traffic appear organic and reducing the risk of bans.
- Accessing geo-restricted content: Many websites display different content based on the user’s geographical location, detected via their IP address. Proxies allow you to select IPs from specific countries or cities, allowing you to bypass geo-restrictions and scrape localized data.
- Enhancing anonymity: Proxies add a layer of separation between your scraping infrastructure and the target server, masking your origin IP address. This improves anonymity while scraping.
Understanding Proxy Types
Choosing the right type of proxy depends on your specific scraping target and budget. Generally, residential proxies provide the best balance of effectiveness and cost, as their genuine ISP-assigned IPs appear more legitimate and are less likely to be blocked than Datacenter IPs. FloppyData offers three types of proxies:
- Mobile Proxies: Mobile proxies route your traffic through IP addresses assigned by mobile network operators (MNOs) to real mobile devices. Because these IPs belong to actual mobile users, they are highly trusted by websites and are very effective at bypassing sophisticated bot detection systems, especially when targeting mobile versions of sites or apps. However, they are typically the most expensive option.
- Residential Proxies:They use IP addresses assigned by Internet Service Providers to homeowners. Like mobile proxies, they appear as genuine user traffic, making them excellent for accessing websites with strict anti-scraping measures and for tasks requiring high levels of anonymity or accurate geo-targeting. They offer a good balance between effectiveness and cost, though they are more expensive than datacenter proxies.
- Datacenter Proxies: They originate from servers housed in data centers. Their main advantages are speed and lower cost, making them suitable for high-volume scraping tasks targeting websites with less stringent security. However, datacenter IPs are often easier for websites to identify and block because they come from known commercial IP ranges.
How To Set Up FloppyData Proxy
Now that you have learned what proxies are, it is time to see how to create a pool of residential proxies with FloppyData.
Step 1: Sign Up For FloppyData
As a first step, sign up for FloppyData and buy residential proxies.
Step 2: Dashboard management
This is the dashboard you will be using:
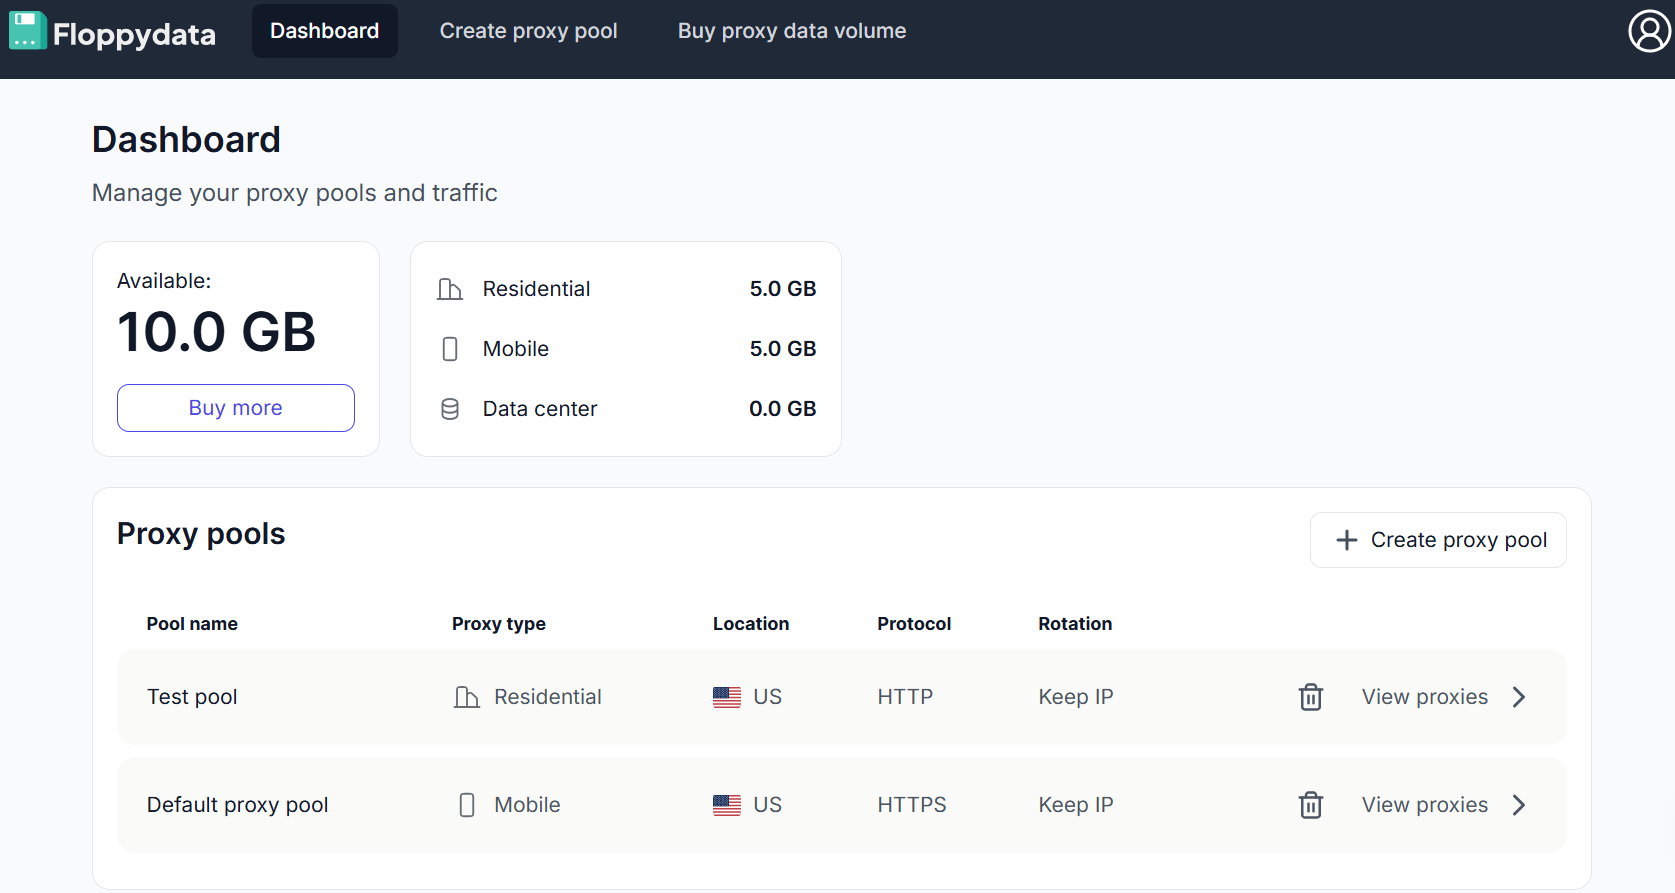
Click on Create proxy pool (if you do not have one already):
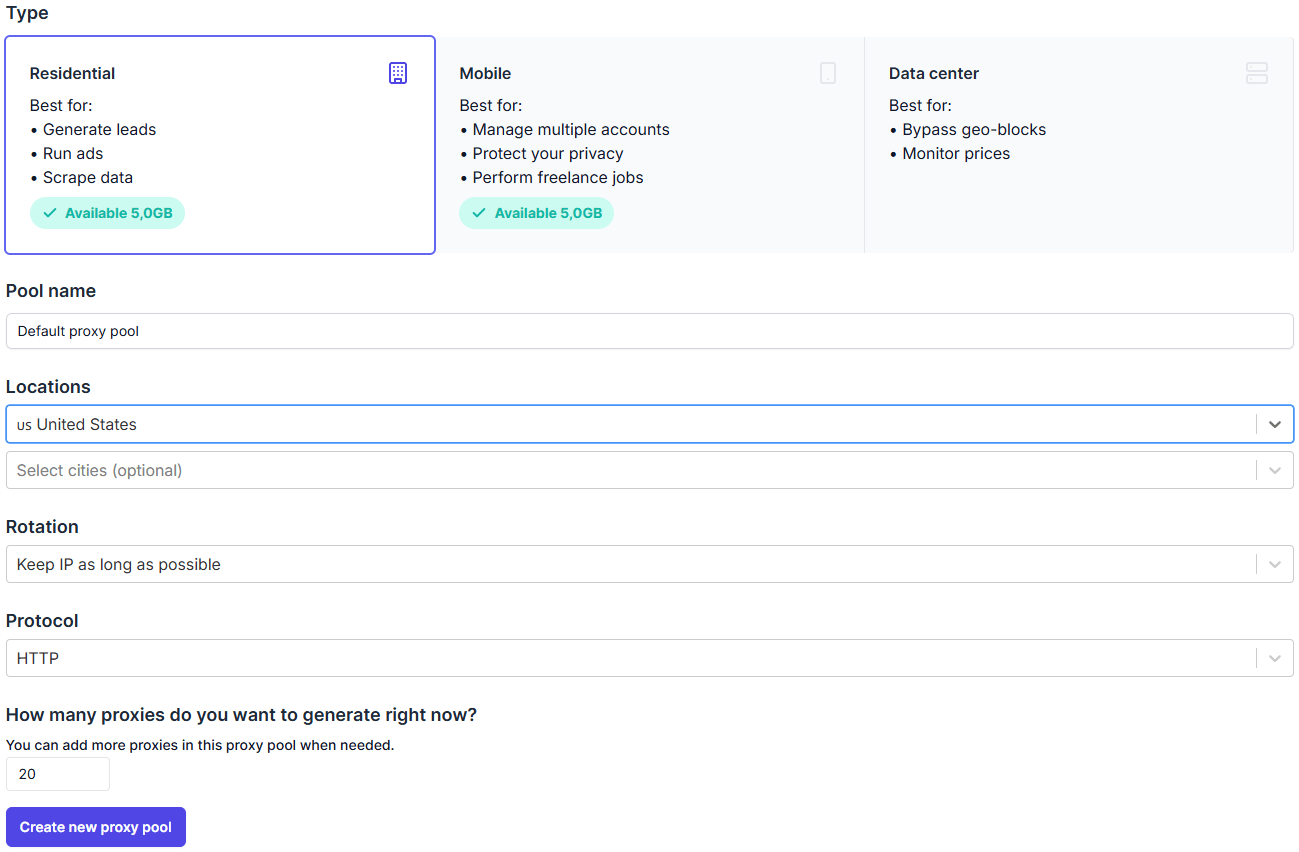
Select Residential and set your favourite settings regarding locations, rotation, and protocol.
When everything is set up, click on Create new proxy pool.
Hooray! You generated a pool of mobile proxies.
Step 3: Use Your Proxies
From the dashboard, you can view your pool of proxies:

Here is how they appear:
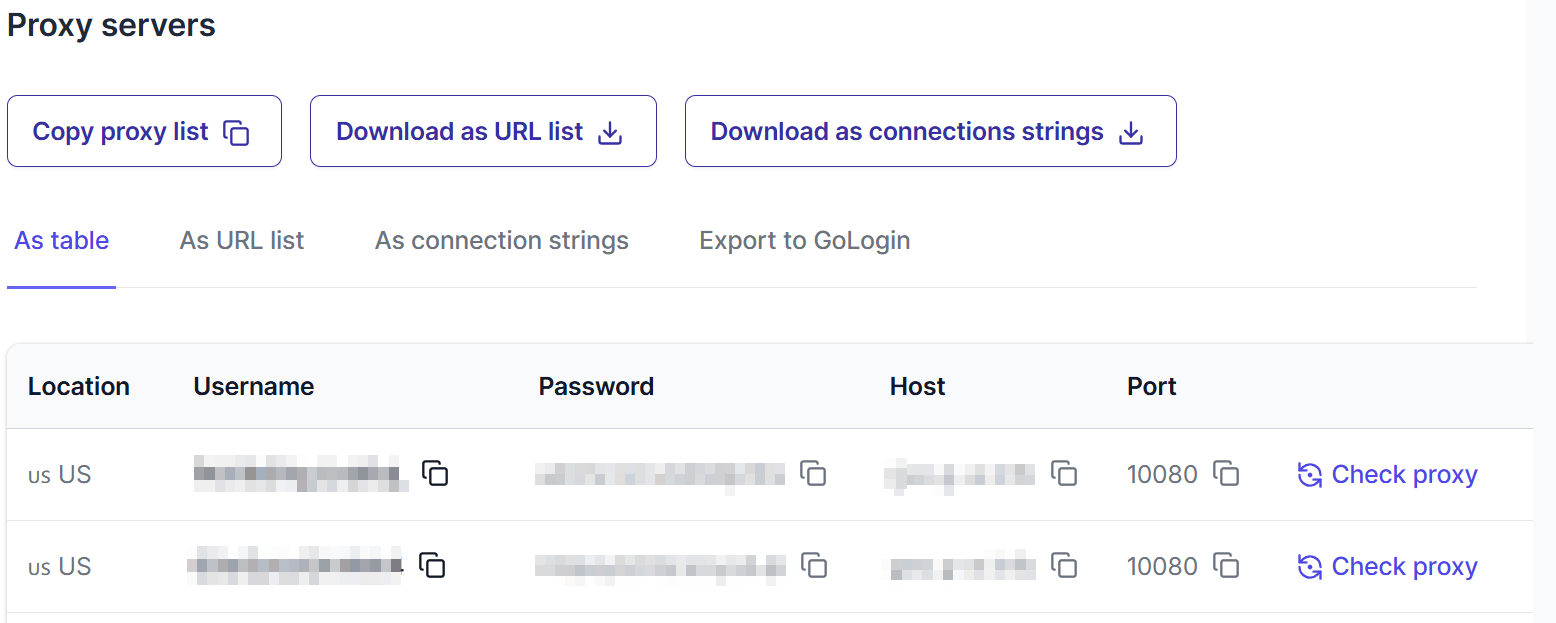
Click on Check proxy to visualize its actual location and IP address:
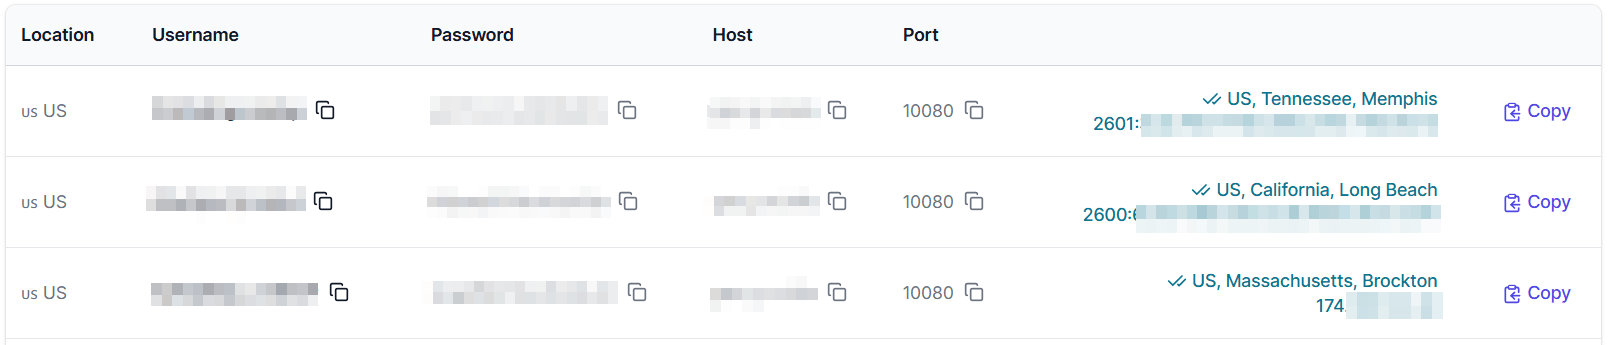
Good! Now you can retrieve all the information needed to use FloppyData proxies in Selenium programs.
How To Use FloppyData Proxy With Selenium: A Step-by-Step Guide
It is now time to learn how to use FloppyData proxies with Selenium in Python.
Requirements
To replicate this tutorial, you need Python 3.7 or higher installed on your machine.
Prerequisites
Suppose you call the main folder of your project floppydata_scaping/. At the end of this step, the folder will have the following structure:
floppydata_scraping/
       ├── main.py
       └── venv/
Where:
main.pyis the Python file that stores all the logic.venv/contains the virtual environment.
You can create the venv/ virtual environment directory like so:
python -m venv venv
To activate it, on Windows, run:
venv\Scripts\activate
Equivalently, on macOS/Linux, execute:
source venv/bin/activate
Now you can install Selenium with:
pip install selenium webdriver-manager
Good! Now you have all set up to use Selenium for web scraping.
Step 1: Setting Up Selenium to Return The Requester’s IP
As a first step, write the following in main.py:
from selenium import webdriver
from selenium.webdriver.chrome.service import Service
from webdriver_manager.chrome import ChromeDriverManager
from selenium.webdriver.chrome.options import Options

# set Chrome options
options = Options()
options.add_argument("--headless=new")

# Initialize Chrome driver
driver = webdriver.Chrome(
    service=Service(ChromeDriverManager().install()),
    options=options
)

# Navigate to target page
driver.get("https://httpbin.io/ip")

# print the HTML
print(driver.page_source)

# Close the browser
driver.quit()
This snippet does the following:
- Configures headless Chrome: It sets up Chrome options to run the browser in “headless” mode (
options.add_argument( "--headless=new")), meaning the browser will operate in the background without a visible user interface window. - Initializes the webdriver: It initializes the Chrome WebDriver, automatically downloading and setting up the correct
chromedriverexecutable usingChromeDriverManager, and applies the headless mode configuration. Thisdriverobject is used to control the browser. - Navigate to the target URL: It instructs the controlled Chrome browser to open the webpage located at the URL
https://httpbin.io/ip.This URL displays the IP of the requester. - Prints results: The method
print(driver.page_source)prints the results (the IP of the requester). - Close browser: The
quit()method closes the browser opened by Selenium and shuts down the WebDriver process, freeing up the associated system resources.
To run the script, type:
python main.py
The result you will obtain is like this one:
{
  "origin": "IP:PORT"
}
Perfect! You have learned how to use Selenium on a basic request.
Step 2: Implement a Proxy in Your Selenium Script
It is now time to go to your FloppyData proxy pool and choose a proxy with its relative port. The implementation code is as follows:
from selenium import webdriver
from selenium.webdriver.chrome.service import Service
from webdriver_manager.chrome import ChromeDriverManager
from selenium.webdriver.chrome.options import Options
from selenium.webdriver.common.by import By

# Define a proxy and port
proxy = "IP:PORT_X"

# set Chrome options
options = Options()
options.add_argument("--headless=new")
options.add_argument(f"--proxy-server={proxy}")

# Initialize Chrome driver
driver = webdriver.Chrome(
    service=Service(ChromeDriverManager().install()),
    options=options
)

# Navigate to target page
driver.get("https://httpbin.io/ip")

# print the body content of the target webpage
print(driver.find_element(By.TAG_NAME, "body").text)

# Close the browser
driver.quit()
With respect to the previous step, here is what has changed:
- A proxy has been defined with its relative port. Those data are retrieved from the FloppyData proxy pool.
- You need to add another argument to manage proxies with
options.add_argument(f"--proxy-server={proxy}"). - In this case, you have to print the text of the body. This is done with the method
find_element(By.TAG_NAME, "body").text.
When you run the script with python main.py, you obtain:
{
  "origin": "IP:PORT_X"
}
Very well! You have implemented the use of a proxy in a Selenium script in Python.
Step 3: Randomize The Proxy Choice
Sometimes, using a proxy is not enough, and your request is intercepted by anti-scraping systems. A way to avoid this is by implementing a rotation logic in a pool of proxies. There are several ways to do so. One is to choose a random proxy from a list like so:
import random
from selenium import webdriver
from selenium.webdriver.chrome.service import Service
from webdriver_manager.chrome import ChromeDriverManager
from selenium.webdriver.chrome.options import Options
from selenium.webdriver.common.by import By

# --- Proxy Rotation Logic ---
def get_random_proxy():
    """Selects a random proxy from the list."""
    proxies = [
        "PROXY_1:PORT_X",
        "PROXY_2:PORT_Y",
        "PROXY_3:PORT_Z",
    ]

    # Randomly pick a proxy
    return random.choice(proxies)


# Pick a random proxy URL for this run
selected_proxy = get_random_proxy()
print(f"Using proxy: {selected_proxy}")

# Set Chrome options
options = Options()
options.add_argument("--headless=new")
options.add_argument(f"--proxy-server={selected_proxy}")
options.add_argument('--ignore-certificate-errors')

# Initialize Chrome driver
try:
    driver = webdriver.Chrome(
        service=Service(ChromeDriverManager().install()),
        options=options
    )

    # Navigate to target page
    driver.get("https://httpbin.io/ip")

    # print the body content
    print("IP address seen by httpbin.io:")
    print(driver.find_element(By.TAG_NAME, "body").text)

except Exception as e:
    print(f"An error occurred: {e}")

finally:
    # Ensure the browser is closed even if errors occur
    if 'driver' in locals() and driver:
        driver.quit()
In this modified version, the choice() method randomly chooses a proxy from the pool in the proxies list.
When you run the script via python main.py, you obtain:
Using proxy: PROXY_2:PORT_Y
{
  "origin": "PROXY_2:PORT_Y"
}
And so on, for all the proxies in the list.
Well done! You have learned how to manage the randomization of proxies with Selenium in Python. This allows you to implement a rotating logic for a pool of proxies.
Conclusion
This guide has walked you through the essential steps of integrating FloppyData proxies with Selenium in Python. You explored the power of Selenium for browser automation and learned the critical role proxies play in web scraping.
By leveraging FloppyData’s proxy solutions with Selenium, you can improve the success rate of your data acquisition efforts, ensuring smoother scraping operations.
Sign up to FloppyData to start using our proxies.
FAQ
How do I set up a FloppyData proxy with Selenium in Python?
First, create a proxy pool in your FloppyData dashboard and copy the proxy details (IP, port, username, password if needed). Then, configure your Selenium browser settings to use this proxy so all automated browsing goes through it.
How can I rotate proxies automatically in Selenium?
You can prepare several FloppyData proxies and assign a different one each time Selenium runs. Switching between proxies helps distribute requests across multiple IPs, lowering the chance of detection, blocks, or rate limits.