
Not sure how to use cURL with a proxy, or why even bother? In this extensive guide, we provide all the insight you’ll need to get cURL up and running with all the protections and advantages proxies bring.
First, you’ll learn what cURL is and why augmenting it with proxies can supercharge your productivity and secure your online privacy. Then, you can follow our step-by-step guide to successfully set up different proxy types for any scenario.
NOTE: While parts of the command examples contain information specific to FloppyData, the commands themselves and the principles behind them apply to all proxies. Just replace the IP and port information with those of any other proxy and you’ll be good to go.
What Is cURL?
cURL is short for “Client for URL.” It’s an open-source internet project that has been active since the 1990s. It provides a free library (libcurl) and command line tool that enable URL-based data transfers between servers and user devices. Its widespread internet protocol support and flexibility in scripting make cURL an excellent networking and automation tool.
How is it useful with proxies?
Pairing cURL with a premium proxy service comes with several advantages. Proxies hide your IP address, contributing to your online privacy. They can forward your requests through servers located anywhere in the world, bypassing geographic restrictions.
Since cURL integrates seamlessly with automated scripts, it speeds up data retrieval and API integration. You can save its output to files or variables and monitor the results. This makes cURL one of the most versatile command line interfaces for web scraping, website monitoring, automated content posting, and much more.
Websites view some of these actions with distrust. For example, even though scraping publicly available data is legal, companies block and blacklist IPs that do so. Proxies, especially the rotating residential kind, mimic genuine user behavior and reduce the likelihood of detection.
Combining them lets cURL use proxy advantages to execute any data retrieval operations successfully.
cURL Proxy Prerequisites
Before you can start using cURL, you’ll need to verify it’s installed and obtain access information provided by your proxy service.
Installing cURL on your system
First, you’ll want to make sure that there’s a version of cURL running on your system. This should be straightforward for most users, as cURL comes with Windows and MacOS by default now. Many Linux distributions also feature it natively.
To check whether you have cURL installed, launch a terminal window (Command Prompt, Terminal, Bash, etc.) and type:
curl --version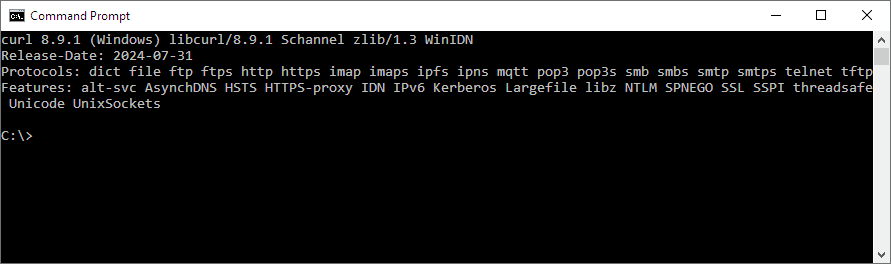
This will display the currently installed version. If it doesn’t you’ll need to install cURL manually. You can do so by visiting the Downloads section of cURL’s official website and picking the correct version for your OS.
Obtaining the required proxy Info
Curl requires several bits of information to work with proxies correctly:
- Protocol type (HTTP, HTTPS, SOCKS5)
- The proxy server’s IP address (or domain name, both work fine)
- Username
- Password
Note that the last two are in use when the proxy server needs authentication. This is a standard security measure most paid proxy service providers use.
Obtaining this information at FloppyData is straightforward. From your dashboard, go to “Create proxy pool.” There, you can specify parameters like the proxy’s protocol, location, and whether to use sticky sessions.
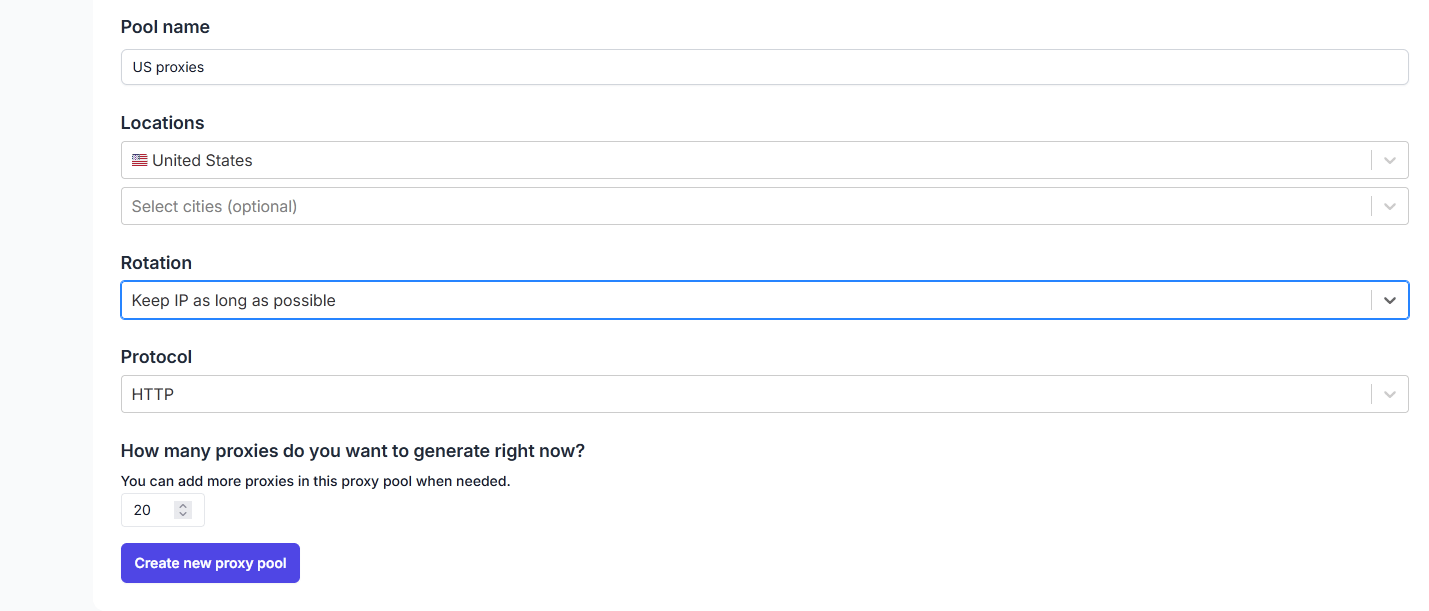
Once the pool is created, you may access it by clicking on “View proxies.” That directs you to a page with all the necessary information viewable in different formats. For use with cURL, switch to the “As URL list” tab and copy the row for the proxy you want.

How to Use cURL Through Proxy?
The basic syntax mostly follows the same formula – “curl” followed by an option and the URL you wish to run the operation on. The most simple command is:
curl https://examplesite.com Technically it’s the equivalent of the -G and –get commands to execute the GET function but these are omitted by default for convenience’s sake.
Let’s use that command to connect to HTTPBin.

This displays your original IP address. Using cURL with a proxy will hide it.
Basic cURL proxy commands
Curl recognizes hundreds of commands. You can view a complete list by typing:
curl --help allThe most basic yet most important command is -x or –proxy followed by the protocol, host, and port, like this:
curl -x [protocol://]host[:port]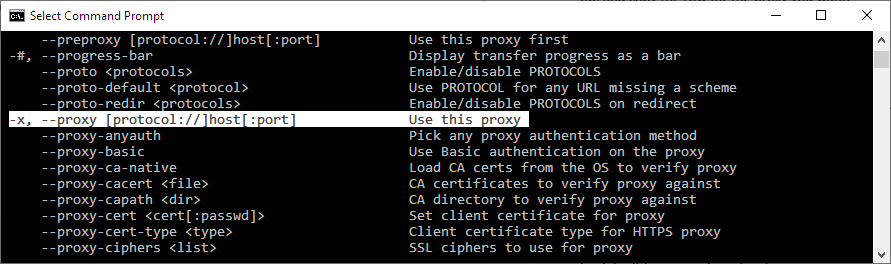
Combining this command with an URL will cause cURL to use the specified proxy when accessing it. Indeed, if we use the parameters provided by FloppyData and go to IPinfo.io, it will display a new IP associated with your desired location along with other information.
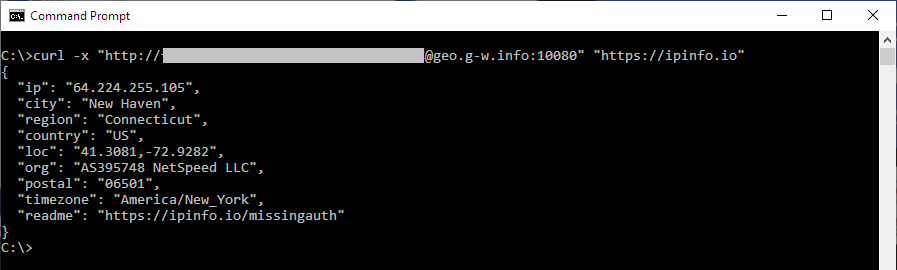
Don’t forget to envelop the proxy info and destination URL with double quotation marks each. Otherwise, cURL might not interpret some special characters correctly and your IP could remain unprotected.
Different proxy types
Syntax-wise, there’s little difference between proxy types. The standard HTTP command for a FloppyData proxy looks like this:
curl -x "http://username:[email protected]:10080"
"https://examplesite.com"
Since HTTP is the default protocol, the following also works:
curl -x "username:[email protected]:10080" "https://examplesite.com"The changes for HTTPS proxies are minimal:
curl -x "https://username:[email protected]:10080"
"https://examplesite.com"
SOCKS5 should follow the same scheme:
curl -x "socks5://username:[email protected]:10080"
"https://examplesite.com"
However, sometimes cURL might report that it can’t complete the SOCKS5 connection. If that happens, use socks5h to use hostname resolution via proxy instead:
curl -x "socks5h://username:[email protected]:10080"
"https://examplesite.com"
You might sometimes run into SSL errors. These happen when a server’s SSL certificate is out of date, self-assigned, or not issued by a proper certificate authority. In cases like these, adding -k to the cURL command will bypass these errors. Remember to use the lowercase k.
curl -x "https://username:[email protected]:10080"
"https://examplesite.com" -k
Some proxies, especially free ones, don’t require usernames and passwords. If you want to risk it, here’s what the general command looks like. The HTTPS and SOCKS5 derivatives follow the same format:
curl -x "http://proxy_ip:proxy_port" "http://examplesite.com"Setting Up cURL Proxy Environment Variables
While cURL’s basic proxy commands work, they have some shortcomings. On the one hand, having to type your authentication credentials, proxy IP, etc., every time is tedious and makes requests look disorganized.
On the other, including proxy credentials and other sensitive information in your scripts increases their vulnerability to attacks. Carelessly sharing your code repository is enough for someone who shouldn’t have access to it to extract such information if they know where in the code to look.
Moreover, hardcoding proxy credentials into every script you use means you’d have to modify these inputs each time it changes. Luckily, you can have cURL use proxy settings stored in environmental variables instead.
Basic environment variables
The idea behind environment variables is to specify proxy-related parameters once and have every subsequent request apply them automatically. The http_proxy variable is invoked for accessing URLs that use the HTTP protocol, while https_proxy does the same for HTTPS.
There’s also the all_proxy variable that determines which proxies to use for all URLs. Keep in mind that protocol-specific variables override it. Also, all variables except http_proxy may be either lowercase or uppercase.
The commands to set the desired proxy are different for Unix-based operating systems like MacOS and Linux compared to Windows. When you’re running FloppyData proxies on the former, use:
export http_proxy="http://username:[email protected]:10080"and
export https_proxy="https://username:[email protected]:10080" In Windows, the commands are:
set http_proxy="http://username:[email protected]:10080"and
set https_proxy="https://username:[email protected]:10080" Now, you can work with URLs without having to bother with proxy-related commands each time.
Making cURL proxy settings permanent
The variable commands we just used are session-based. cURL will revert to its defaults once you close the terminal window, meaning your IP will be visible next time if you don’t set the environment variables again.
Saving them to a separate file cURL can reference every time without further user input makes more sense.
Making these settings permanent in MacOS and Linux involves creating a .curlrc file in your home directory with a terminal and Nano, like this:
cd ~
nano .curlrc
Windows users will have to create a _curlrc file in their AppData folder. To locate it, type “echo %appdata%” in the Command Prompt without quotation marks. This will return the folder’s location, usually C:\Users\YourUsername\AppData\Roaming. Create the _curlrc file inside that directory.
Paste your proxy details into the new file with a text editor and save the changes. For FloppyData, use this:
proxy="http://username:[email protected]:10080"NOTE: the resulting configuration will apply exclusively to cURL and will always be on by default. It basically acts like a permanent all_proxy variable.
Consider that this configuration only accounts for one proxy type. That might be all you need if you rely on an HTTP proxy for data scraping. However, you’ll still have to use HTTPS or SOCKS5 commands or make the appropriate environment variable settings changes if you want to switch to these protocols.
Proxy exceptions
Applying the above settings enforces cURL through proxy for all commands. While logical as a default, sometimes such a setup can get in your way. For example, it’s not usually necessary to route local environment requests — like accessing a machine on your LAN — through a proxy.
That’s where the no_proxy command comes in. Let’s say you leverage proxies for data scraping but don’t want them to affect company infrastructure or local dev servers. You’d accomplish this by typing:
export no_proxy=localhost,127.0.0.1,dev.mycompany.comIn Linux or MacOS, or:
set no_proxy=localhost,127.0.0.1,dev.mycompany.comIn Windows.
Toggling proxies on and off
Finally, here’s a tip for boosting efficiency. Linux and MacOS users can edit the .bashrc file to turn proxy usage on and off with a few quick commands. It’s especially useful in situations where you just need to run a few cURL commands with an active proxy and then revert to normal.
Open .bashrc, add the following lines, and save the changes:
alias proxyon="export
http_proxy='http://user:password@@geo.g-w.info:10080'; export
https_proxy='http://user:[email protected]:10080'"
alias proxyoff="unset http_proxy; unset https_proxy"From now on, typing “proxyon” and “proxyoff” will turn on and disable your proxy, respectively. The cURL configuration file can become even more helpful if you add user agent and connection timeout info.
Which Proxy Type Should You Pair with cURL?
That depends on your use cases and budget. Here’s a breakdown to help you make a decision.
- Datacenter proxies – They are among the most stable proxies and offer high bandwidth. They’re also the most cost-effective option. Use datacenter proxies for low-stakes bulk scraping.
- Residential proxies – Sourced from genuine users from across the globe, residential proxies excel at bypassing geo-restrictions and appearing trustworthy. They’re more expensive than their datacenter counterparts, but the increased anonymity and lower detection chances are worth it.
- ISP proxies – A hybrid type that combines the authenticity of ISP-issued IP addresses with the speed of datacenter proxies. They’re great for account management and maintaining long sessions. ISP proxies also evade blocks more successfully than datacenter proxies while being comparably speedy.
- Mobile proxies – Enjoy excellent trust since they use real cellular networks. Slower and more expensive than the others but they make up for it with high detection avoidance on sites with the most stringent safeguards.
Conclusion
Combining cURL’s straightforward yet powerful commands with proxy features like IP rotation and geo-spoofing is empowering. It streamlines automation and adds flexibility to networking tasks, increasing adaptability and ensuring success whatever your use case.
Hopefully, the information in this extensive guide will help you harness the power of the synergy between cURL and proxies and optimize your workflows.
FAQ
How do I configure cURL to use a proxy?
1. Ensure cURL is installed (curl --version). Get your proxy type (HTTP/HTTPS/SOCKS5), IP/domain, port, and, if needed, username and password from your provider.
2. Run:
curl --proxy "http://user:pass@proxy_IP:port" https://target-url.com
Use FloppyData’s “As URL list” feature in the dashboard to retrieve these credentials easily.
What is cURL and why use it with a proxy?
cURL (Client URL) is a versatile command‑line tool for transferring data over URLs via various protocols. Paired with proxies—especially rotating residential ones - it boosts privacy, bypasses geo‑restrictions, and helps avoid IP blocks, making it ideal for tasks like scraping, automated API access, and monitoring.